Farmers markets, especially in Austin, are always an excellent place to find gluten free goodies. If there’s are not one or more full stands dedicated to gluten free, there are always gluten free options. I’ve had some luck at the Barton Creek Farmers Market, but my absolute favorite is the Texas Farmers’ Market at Mueller. I have plans to try more once things stabilize a bit more (specifically the SFC Farmers Market at Sunset Valley and Downtown). But Mueller is where I met one of my favorite GF brands ever.
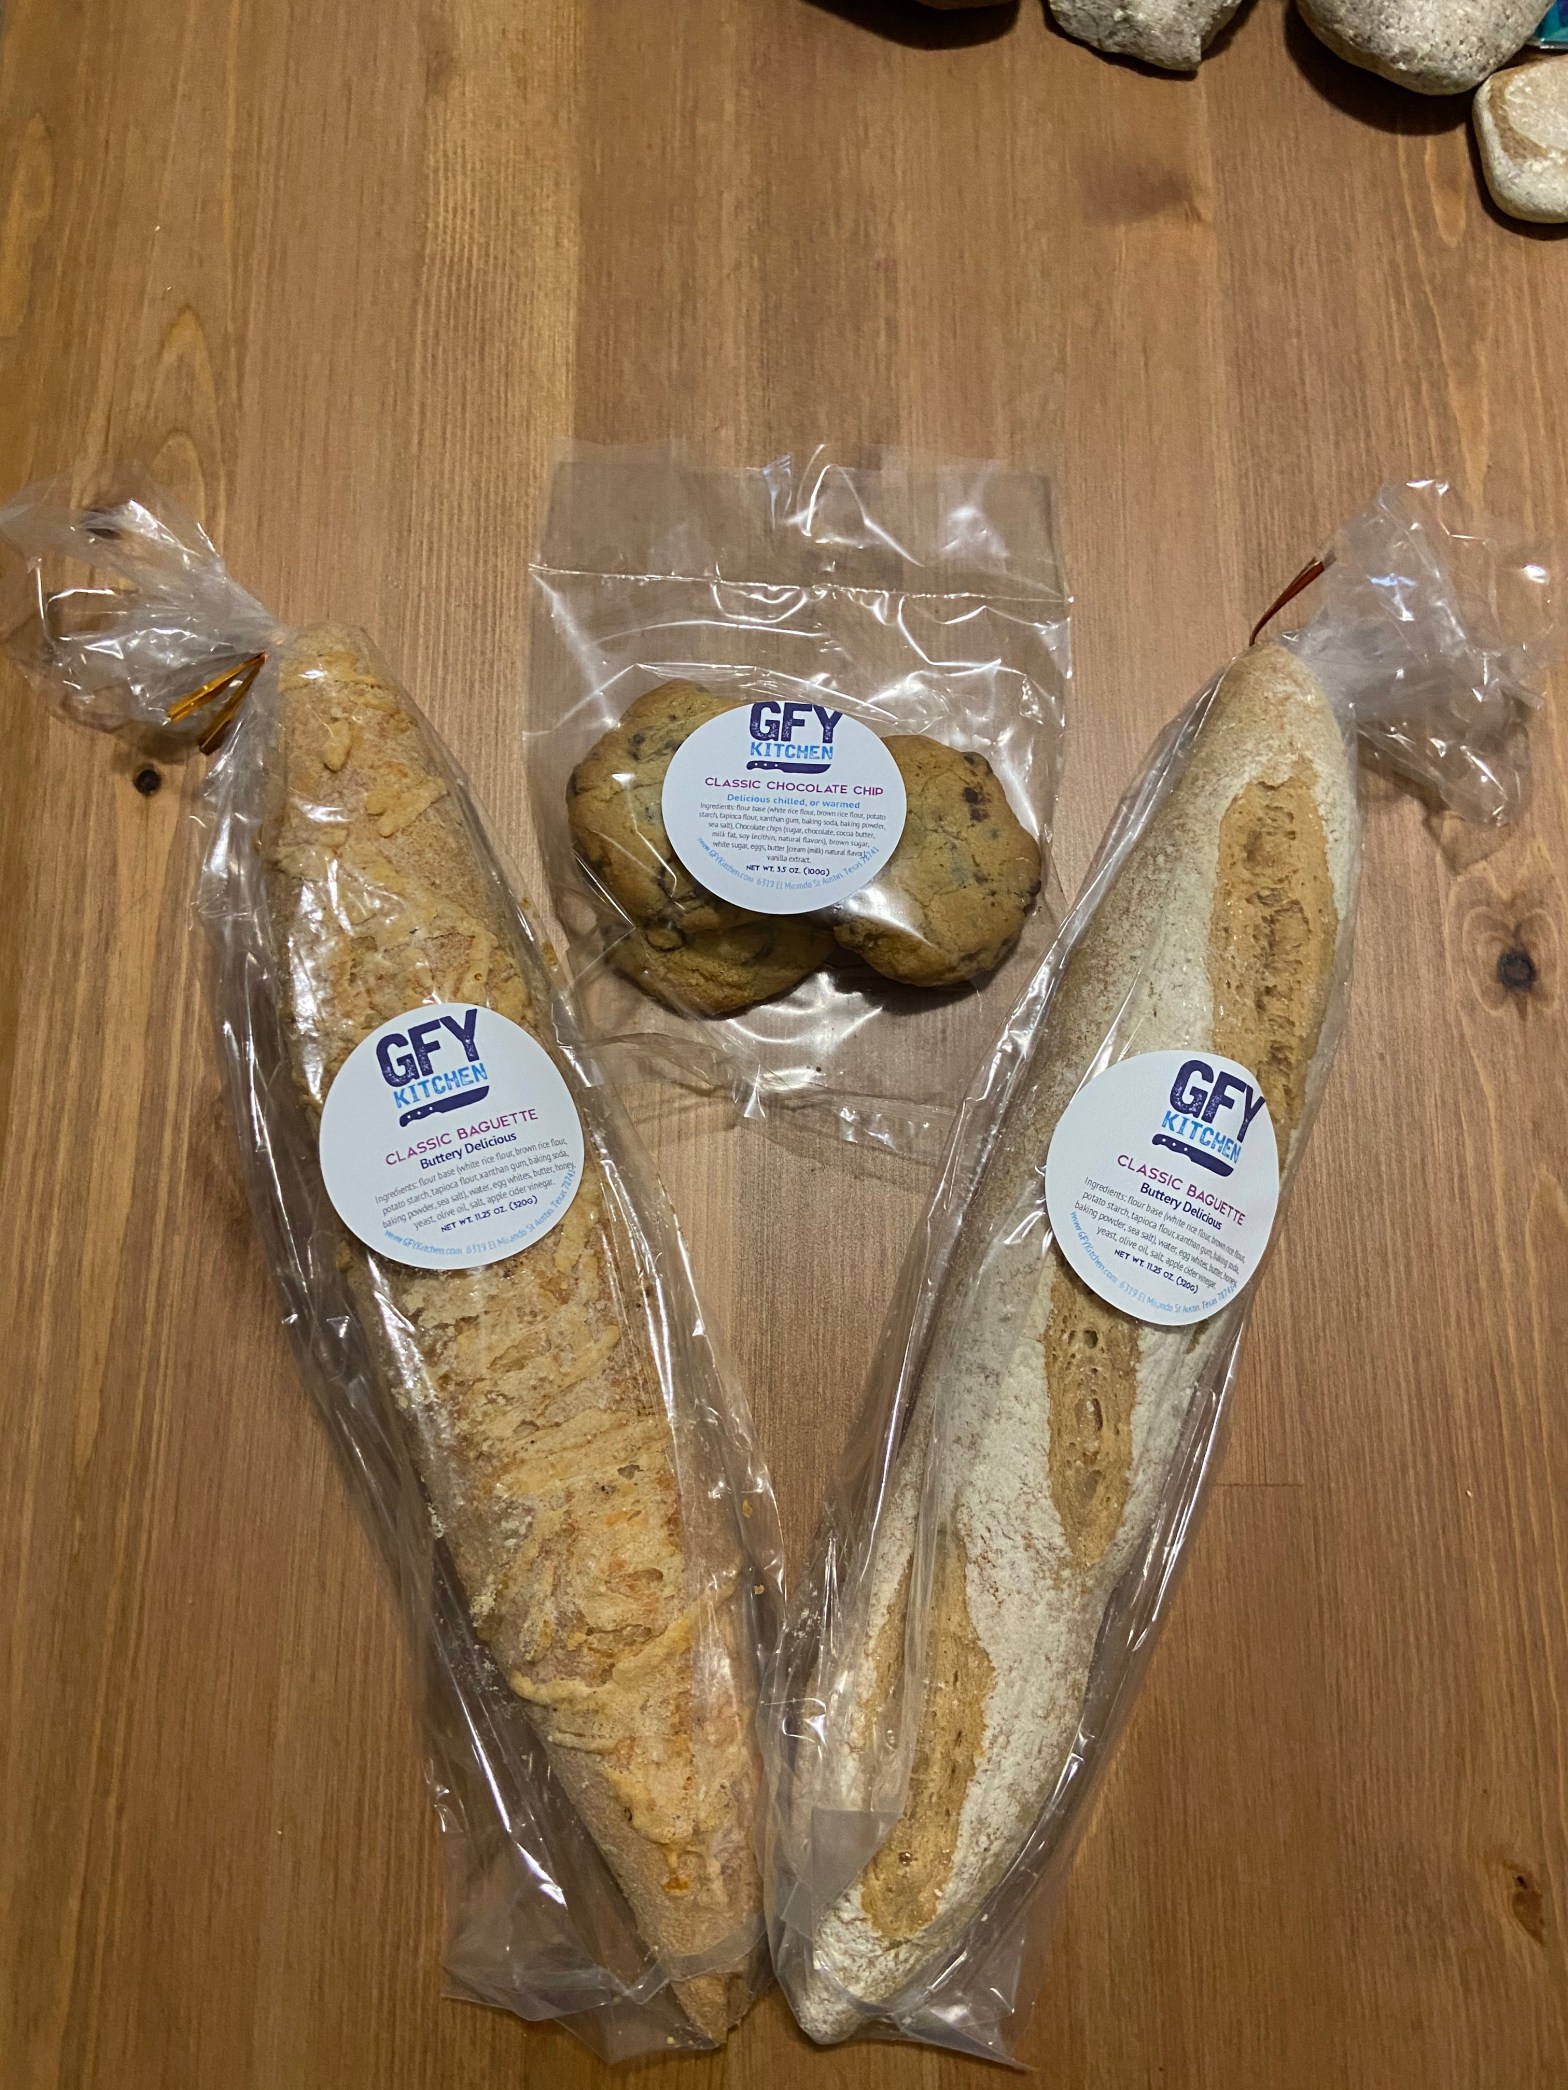
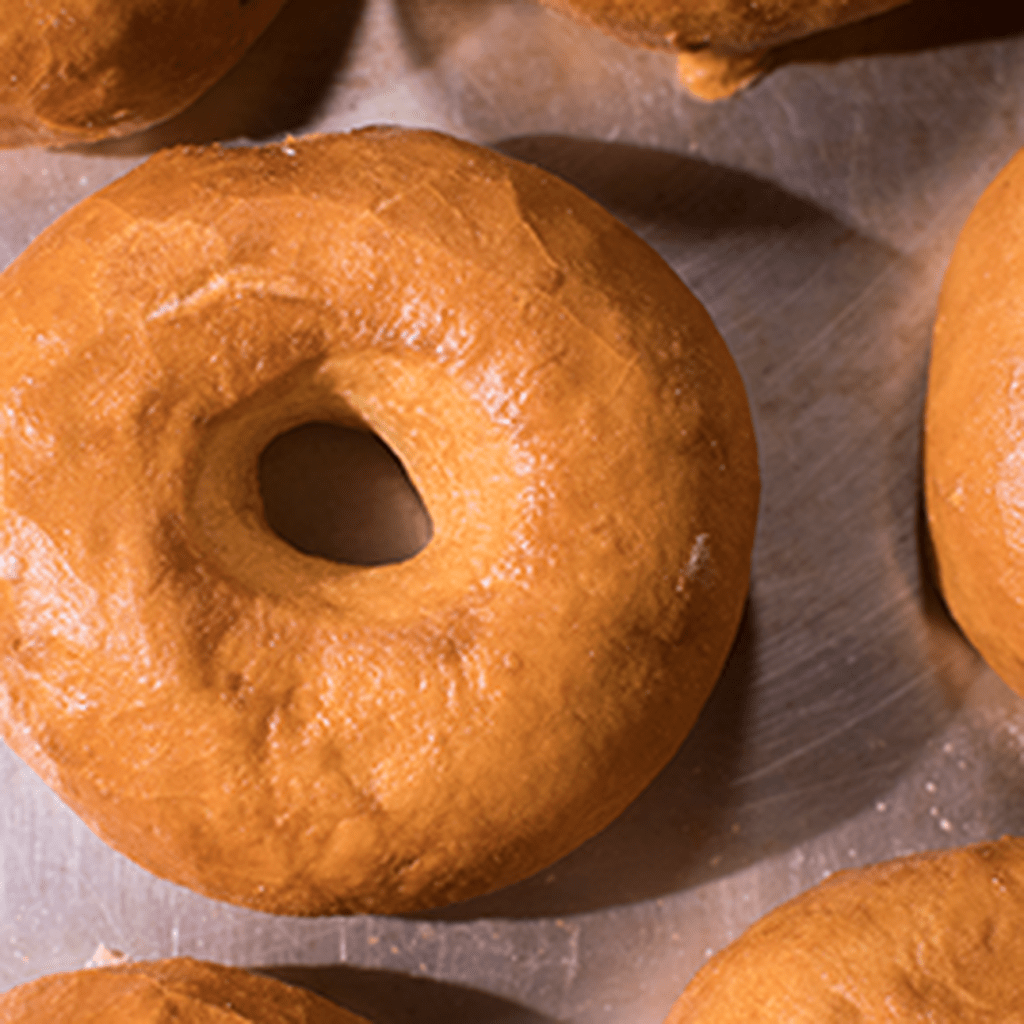
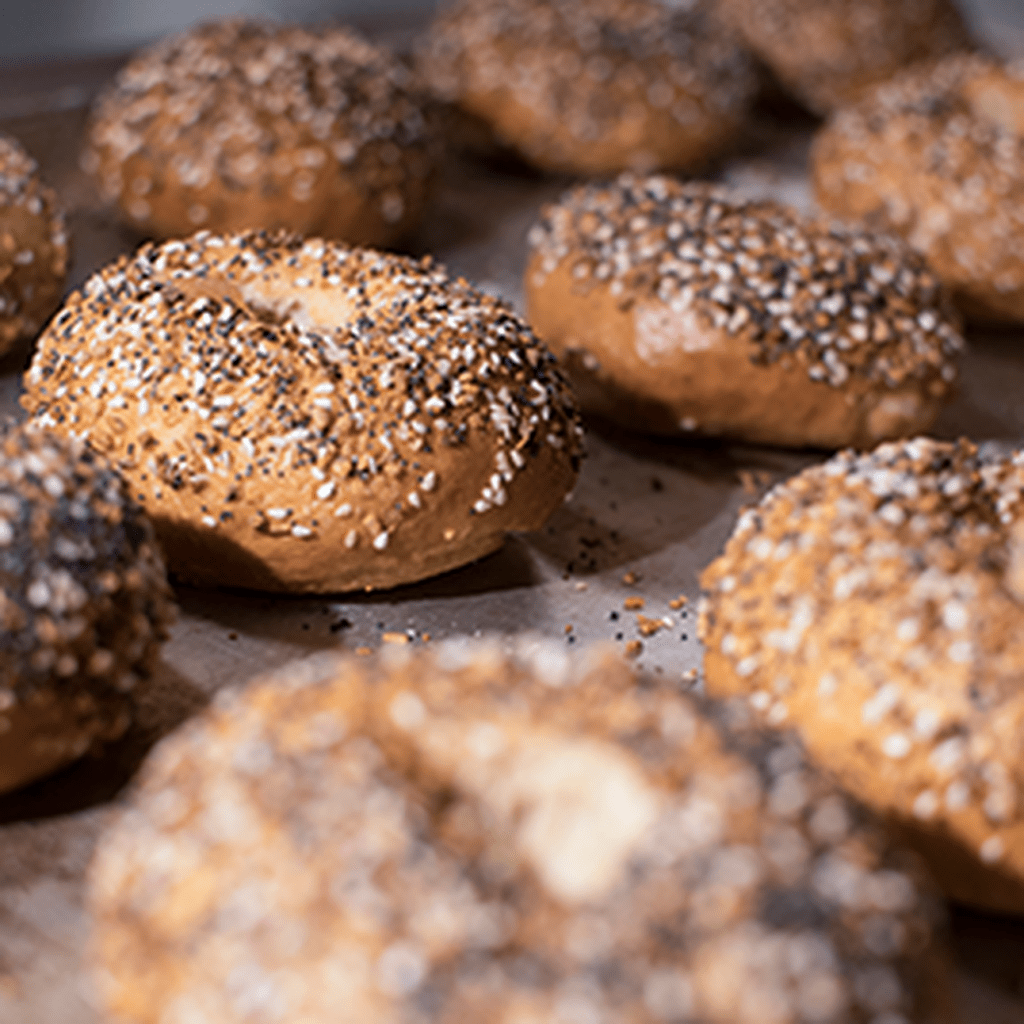
GFY Kitchen (or Gluten Free Yourself) is a 100% gluten free bakery based in Austin. They attend the Saturday SFC Downtown market and Mueller on Sundays. Here they carry their bread, but also a variety of GF treats including toaster pastries, cookies, muffins and more.
They also have a weekly bread drop on Wednesdays in North and South Austin which is what I’m about to rave about.
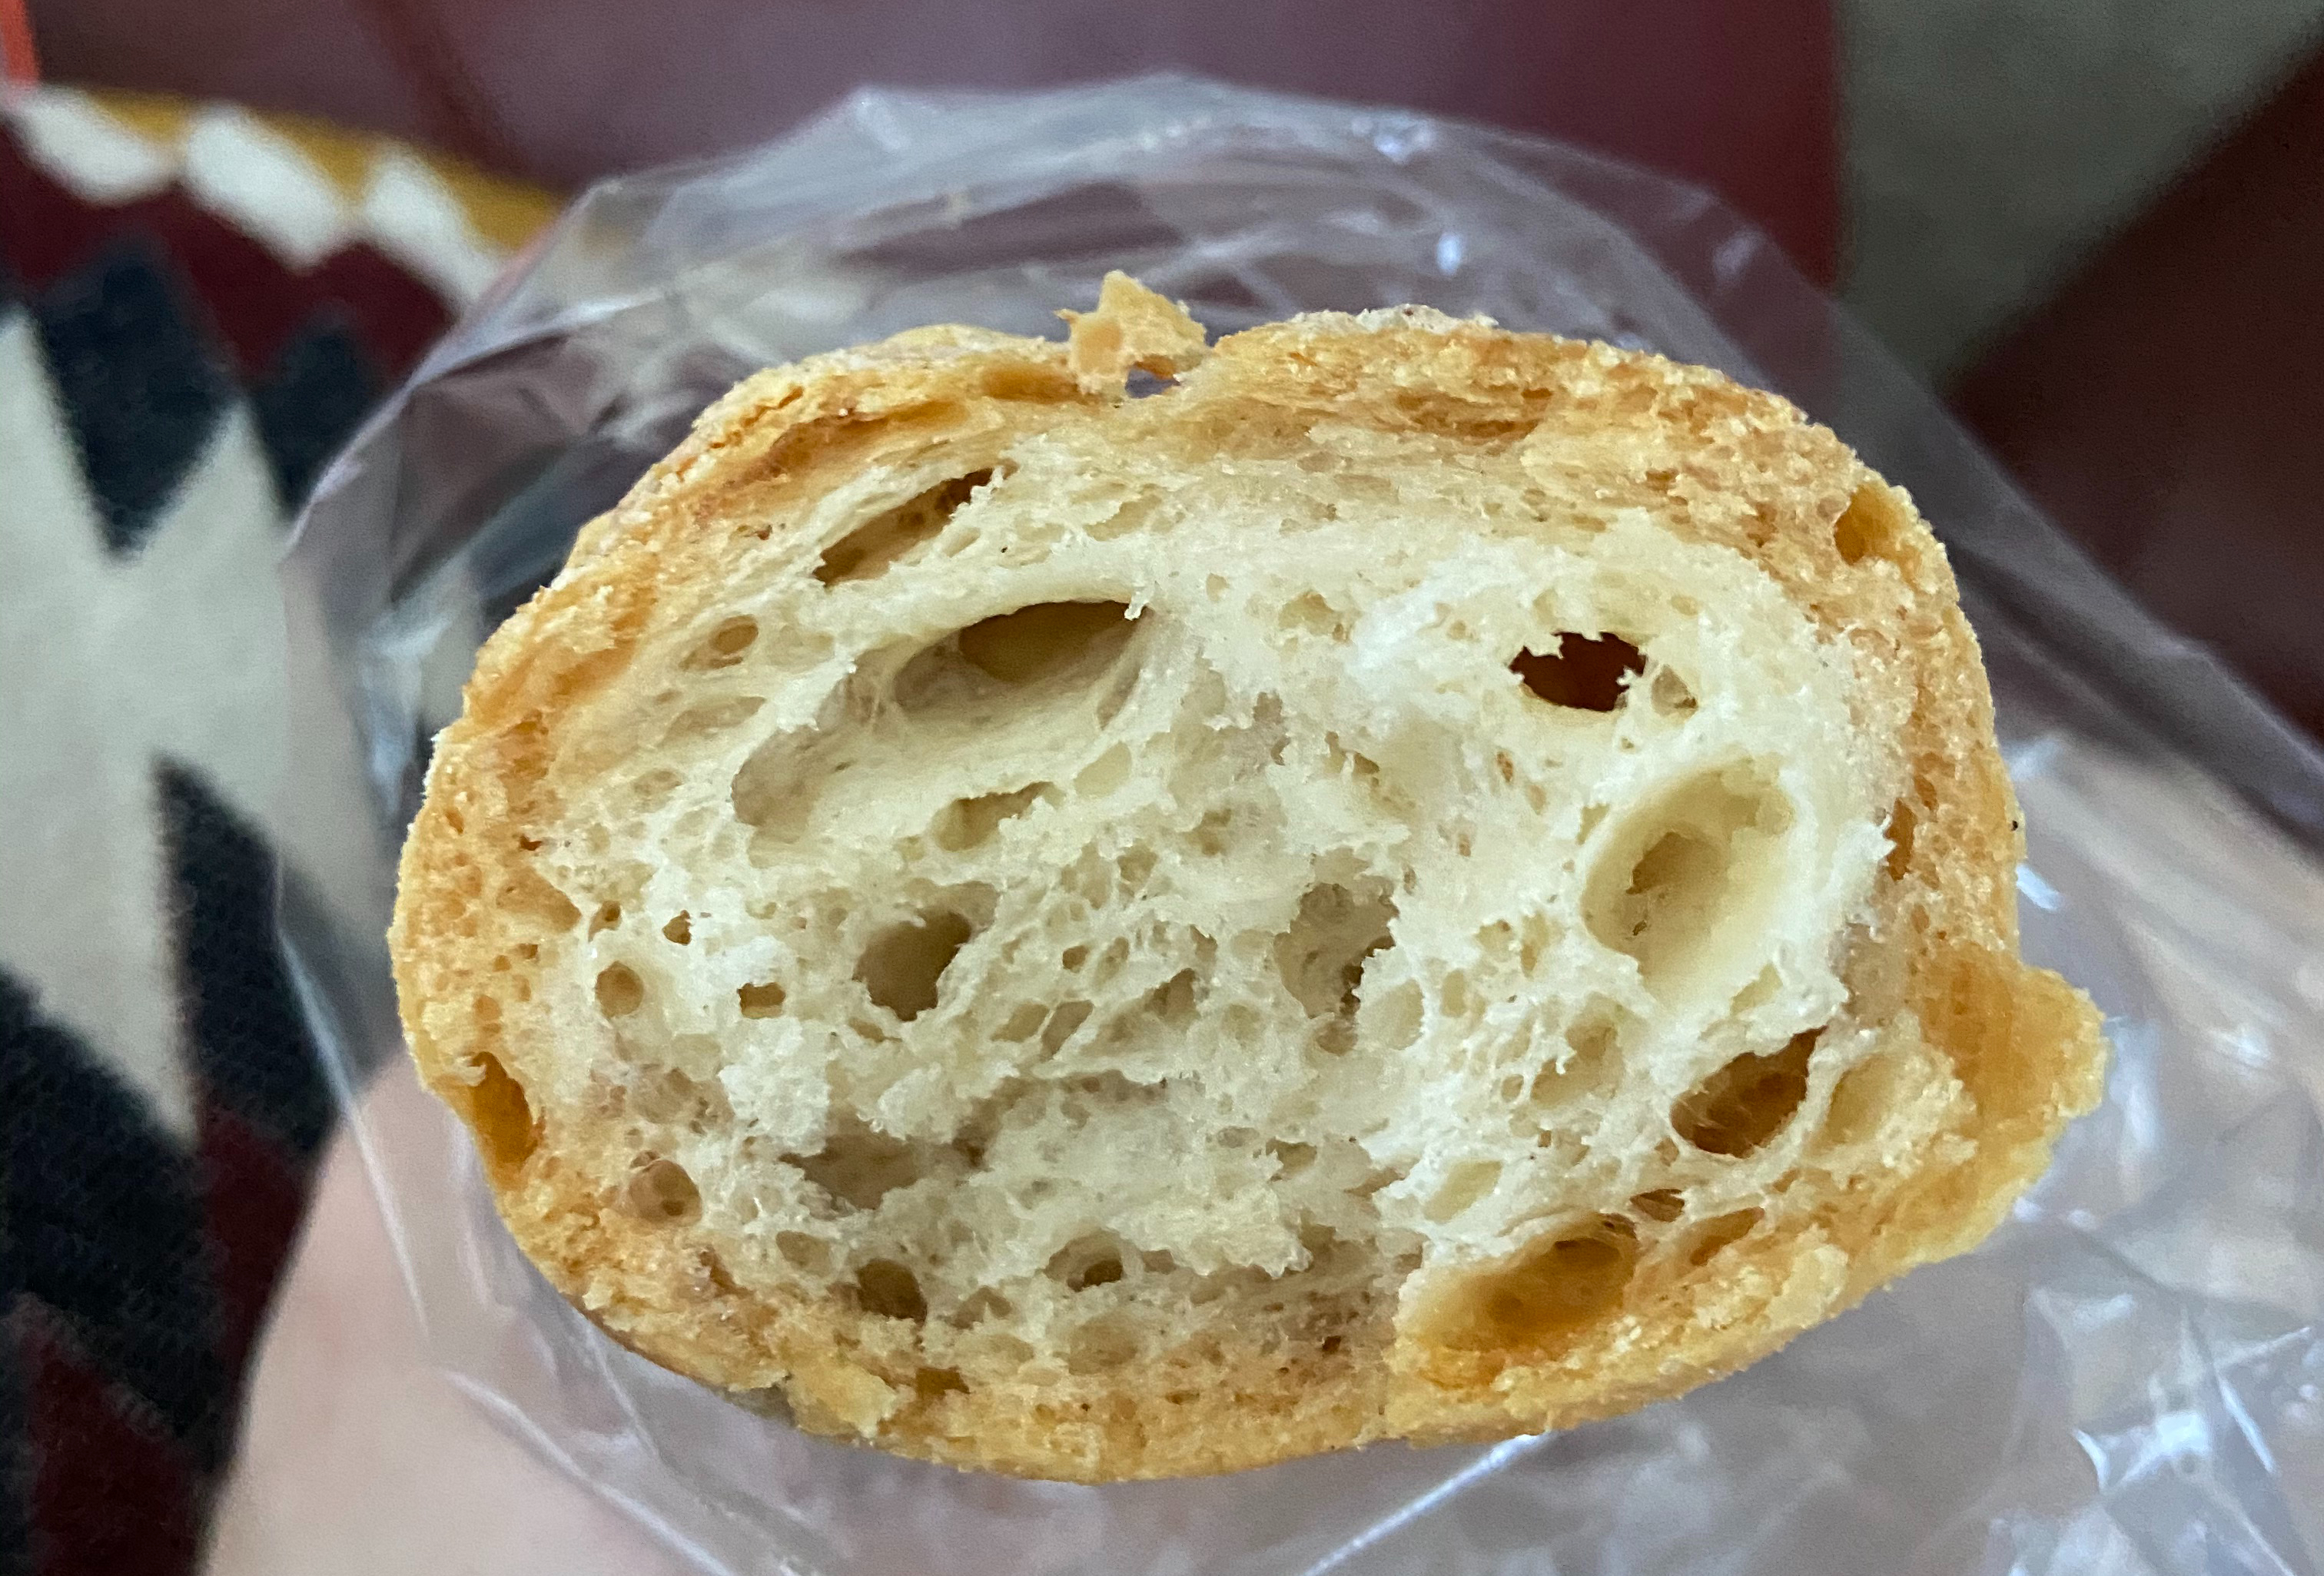
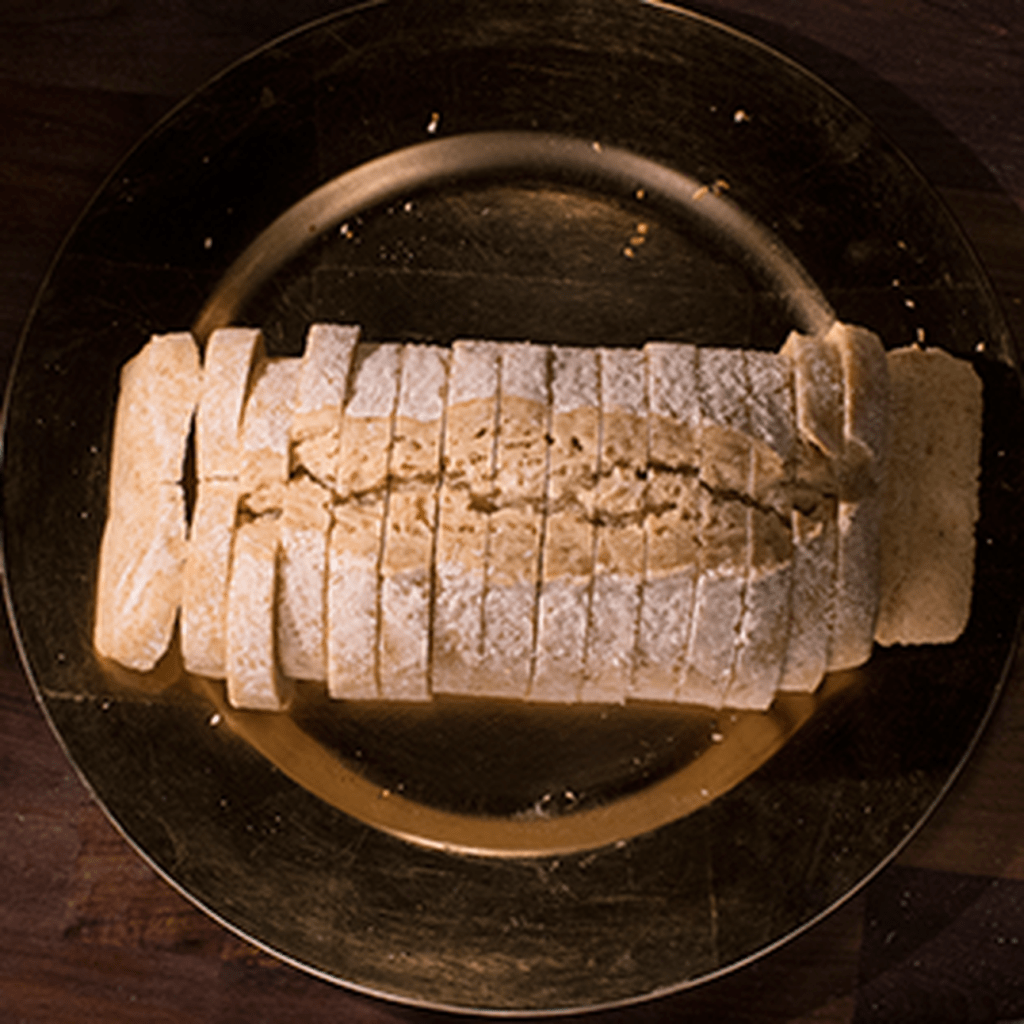
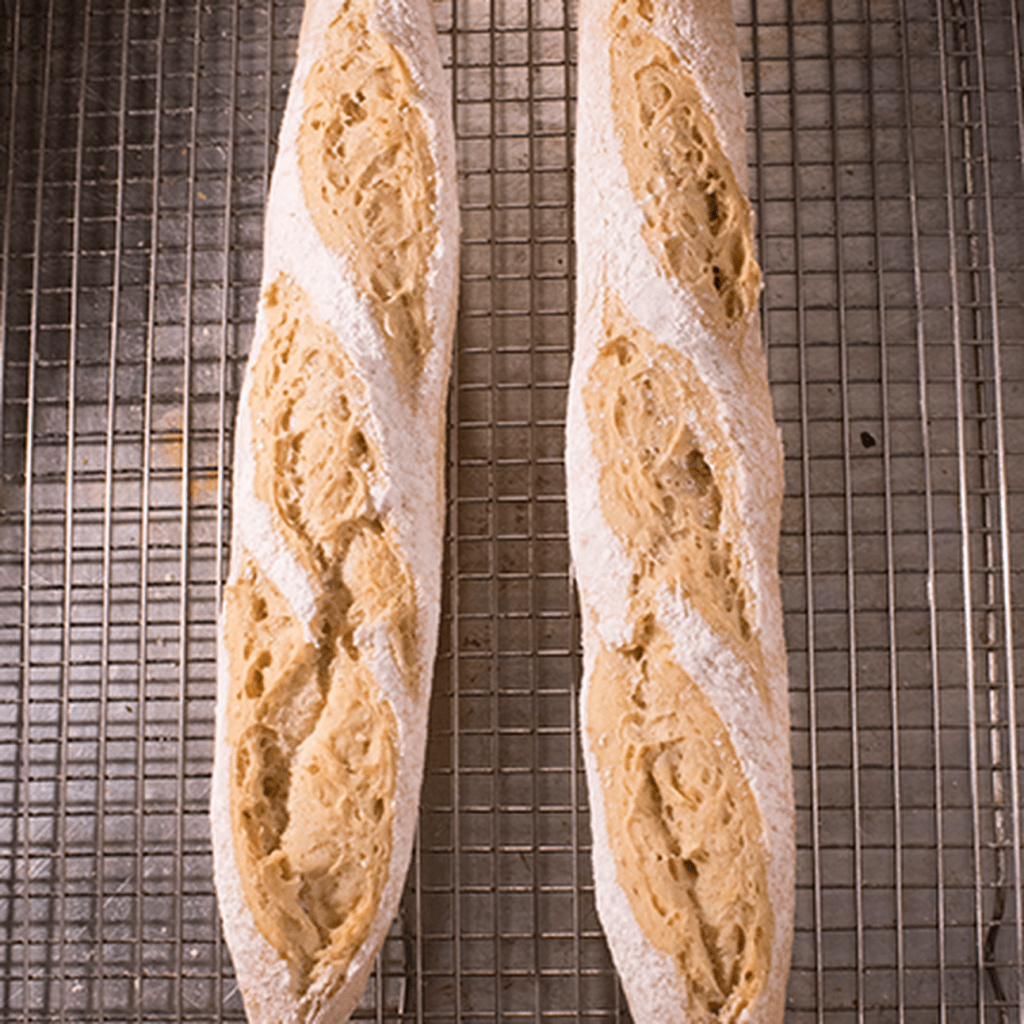
I cannot more highly recommend this bread! Especially the baguette. Look at it! The crust is crispy! The inside is soft! It is the closest thing to a gluten-full loaf I have had in a long long time. Yesterday, I did the bread drop for the first time. I ate almost an entire loaf as soon as I got home. They even included some cookies for free!
I am perpetually in awe. I know from past markets that their Kaiser Rolls are just as good.
I cannot wait to try everything else on their menu. I’ve added some images below from their website. If you are GF in the Austin area, don’t wait!
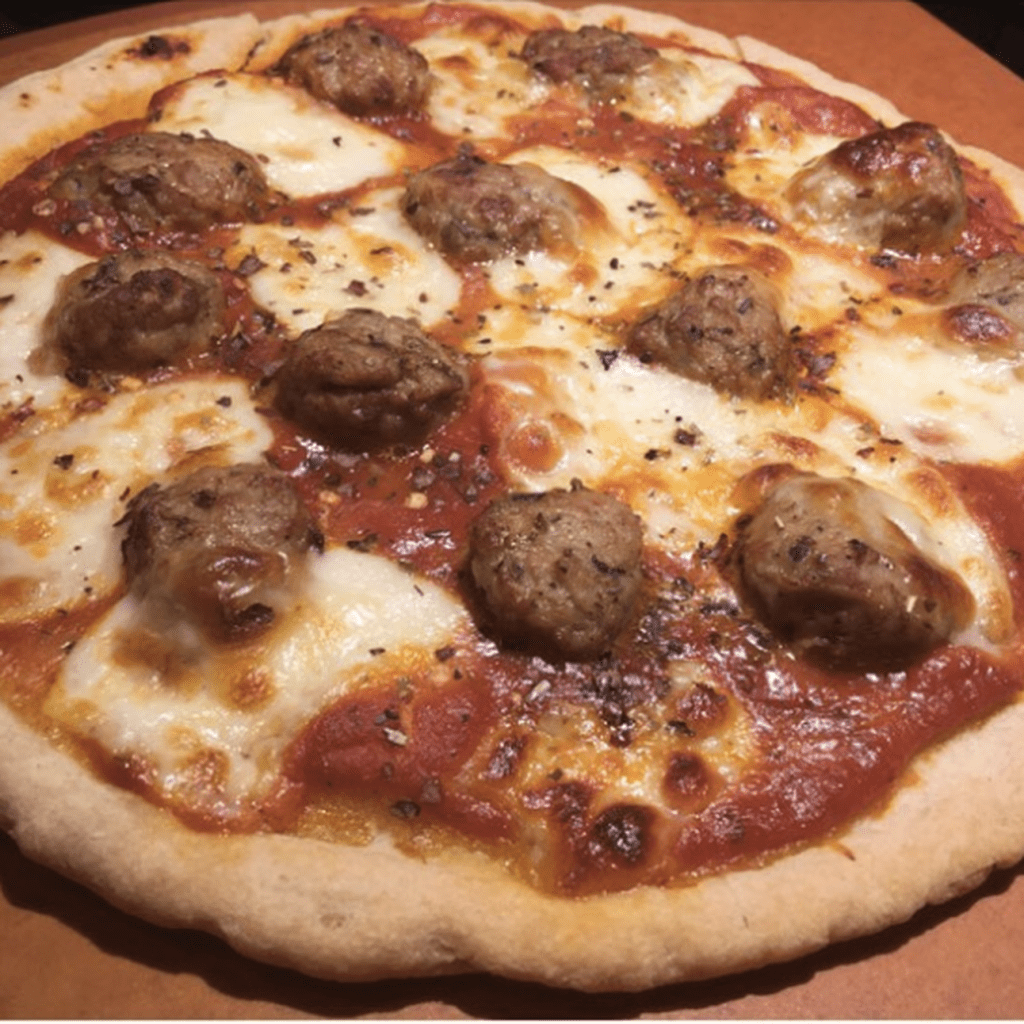
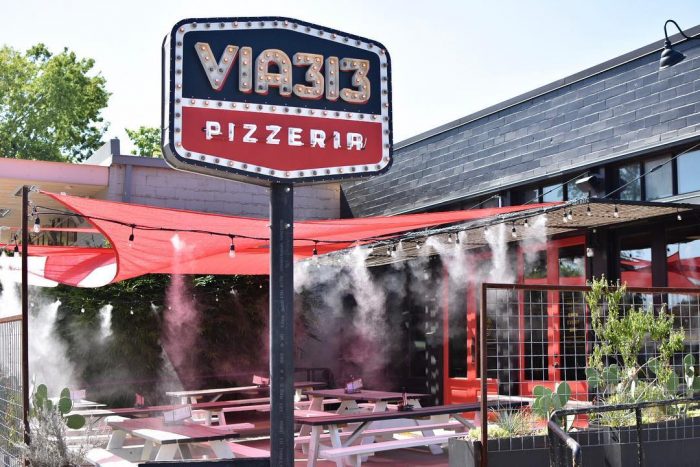
The unfortunate truth is that when I hear “gluten free pizza option” it usually translates to “cracker crust with sauce and cheese”. I am perpetually searching for something fluffy and light with a thick crust. Every once in a long long while I will find it! This is one of those times.
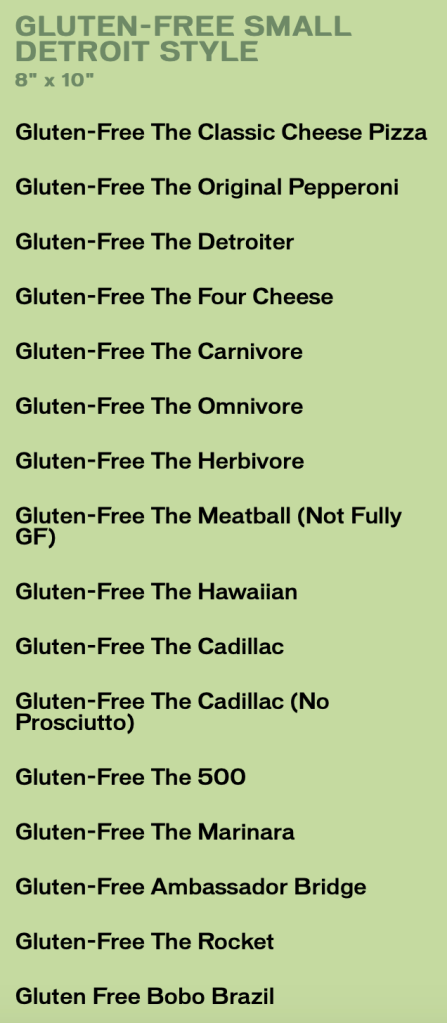
Via 313 is a pizza chain in Austin Texas serving Detroit style pizzas at three brick and mortar locations as well as two food trucks. Several months ago a gluten free friend had pitched it to me as a “gluten free deep dish”. Gluten free deep dish?? Unheard of! It was immediately added to my list. But it took me several months to get to it. Finally I could wait no longer! During this time of lockdown, Via 313 is doing pick up orders at all three of its brick and mortar locations. These pizzas are definitely pricier than your average Dominos (especially with the GF uncharge), but well worth it! You can order any of their 16 different options in gluten free (although The Meatball is not fully GF).
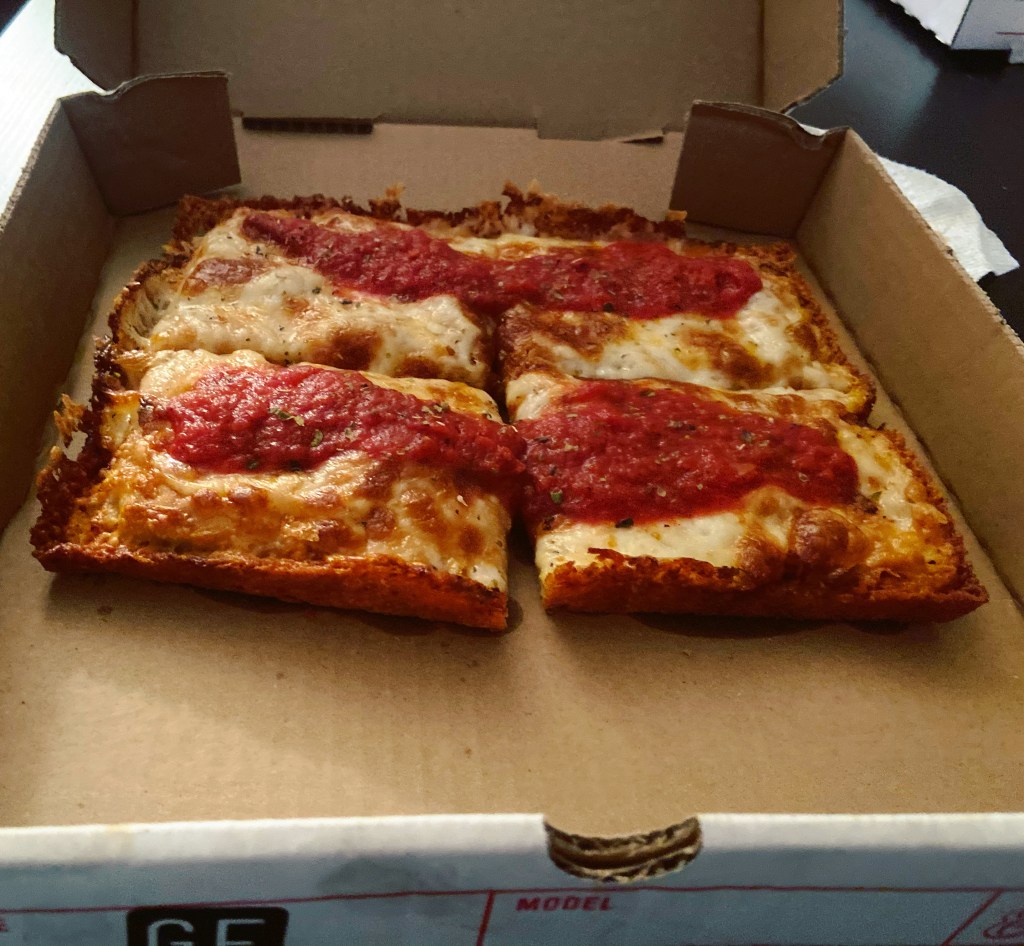
I’m a plain kinda gal (and looking to save money) so I went with the cheese. It costs about $14 ($11 pizza price + $3 GF tax) then tax, service fee, tip, etc. My roommate and boyfriend also each ordered a pizza so I got a good comparison for GF vs gluten-full. And they looked pretty much the same! Which felt like a miracle.
Just look at it! The crust on this pizza is so thick but so light. It truly tastes like bread. I imagine it’s because it is baked in a pan that it can rise so much, but it was fluffy and delicious with a great amount of cheese. It was all I could do not to eat it all in one sitting! I cannot recommend this pizza enough. While it didn’t hav the traditional crust I crave, the pure bread-like texture more than made up for that. I cannot wait for my next pizza night!
8 tablespoons frozen butter, cut into small pieces (doesn’t have to be fully frozen just very cold and not at all melted)
1/4 cup Greek yogurt (can use plain or vanilla)
1/4 cup ice cold water
2 teaspoons lemon juice
FILLING:
3 1/2 cups sliced strawberries (I used frozen because that’s what I had but use fresh if you’ve got them!
1/2 cup ground almonds (or almond flour)
1 tablespoon GF 1 to 1 flour
1/4 cup sugar, plus more for dusting
FOR THE GLAZE:
1 egg yolk
1 teaspoon water
1. To prepare crust, combine flour and salt in the bowl of a food processor. Pulse twice to combine.
2. Add butter and pulse until mixture resembles coarse meal. It’s important that the butter is cold for this step!
3. Transfer mixture to a large bowl.
4. In a smaller bowl, whisk together yogurt, water, and lemon juice.
5. Pour over flour mixture and use hands or rubber spatula form dough into a ball. Wrap in plastic and store in freezer for 20 minutes.
6. To prepare filling, whisk together almond meal, flour, and 1/4 cup sugar in a small bowl. I didn’t have almond meal on hand so I used almond flour and it turned out great!
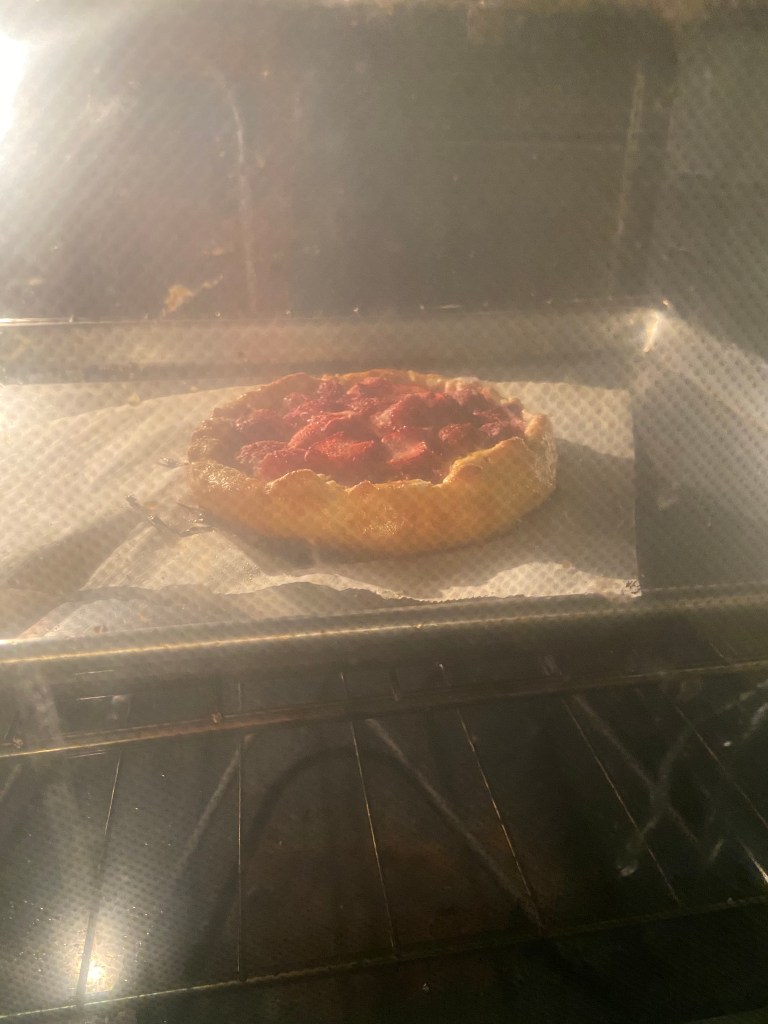
7. Preheat oven to 400 degrees Fahrenheit.
8. On a large, floured piece of parchment paper, roll the chilled dough into a 12-inch circle. (You can roll it out on a separate surface, but this saves time and cleaning.)
9. Fold over the edges of dough, pleating to make it fit. Basically you just want to create an edge so the center stays put. Doesn’t have to be pretty!
10. Whisk together egg yolk and water. Dust with more sugar if you’d like. Brush over the crust and bake for 30 minutes or until crust is puffy and golden brown.
11. Enjoy!
MY TAKEAWAYS:
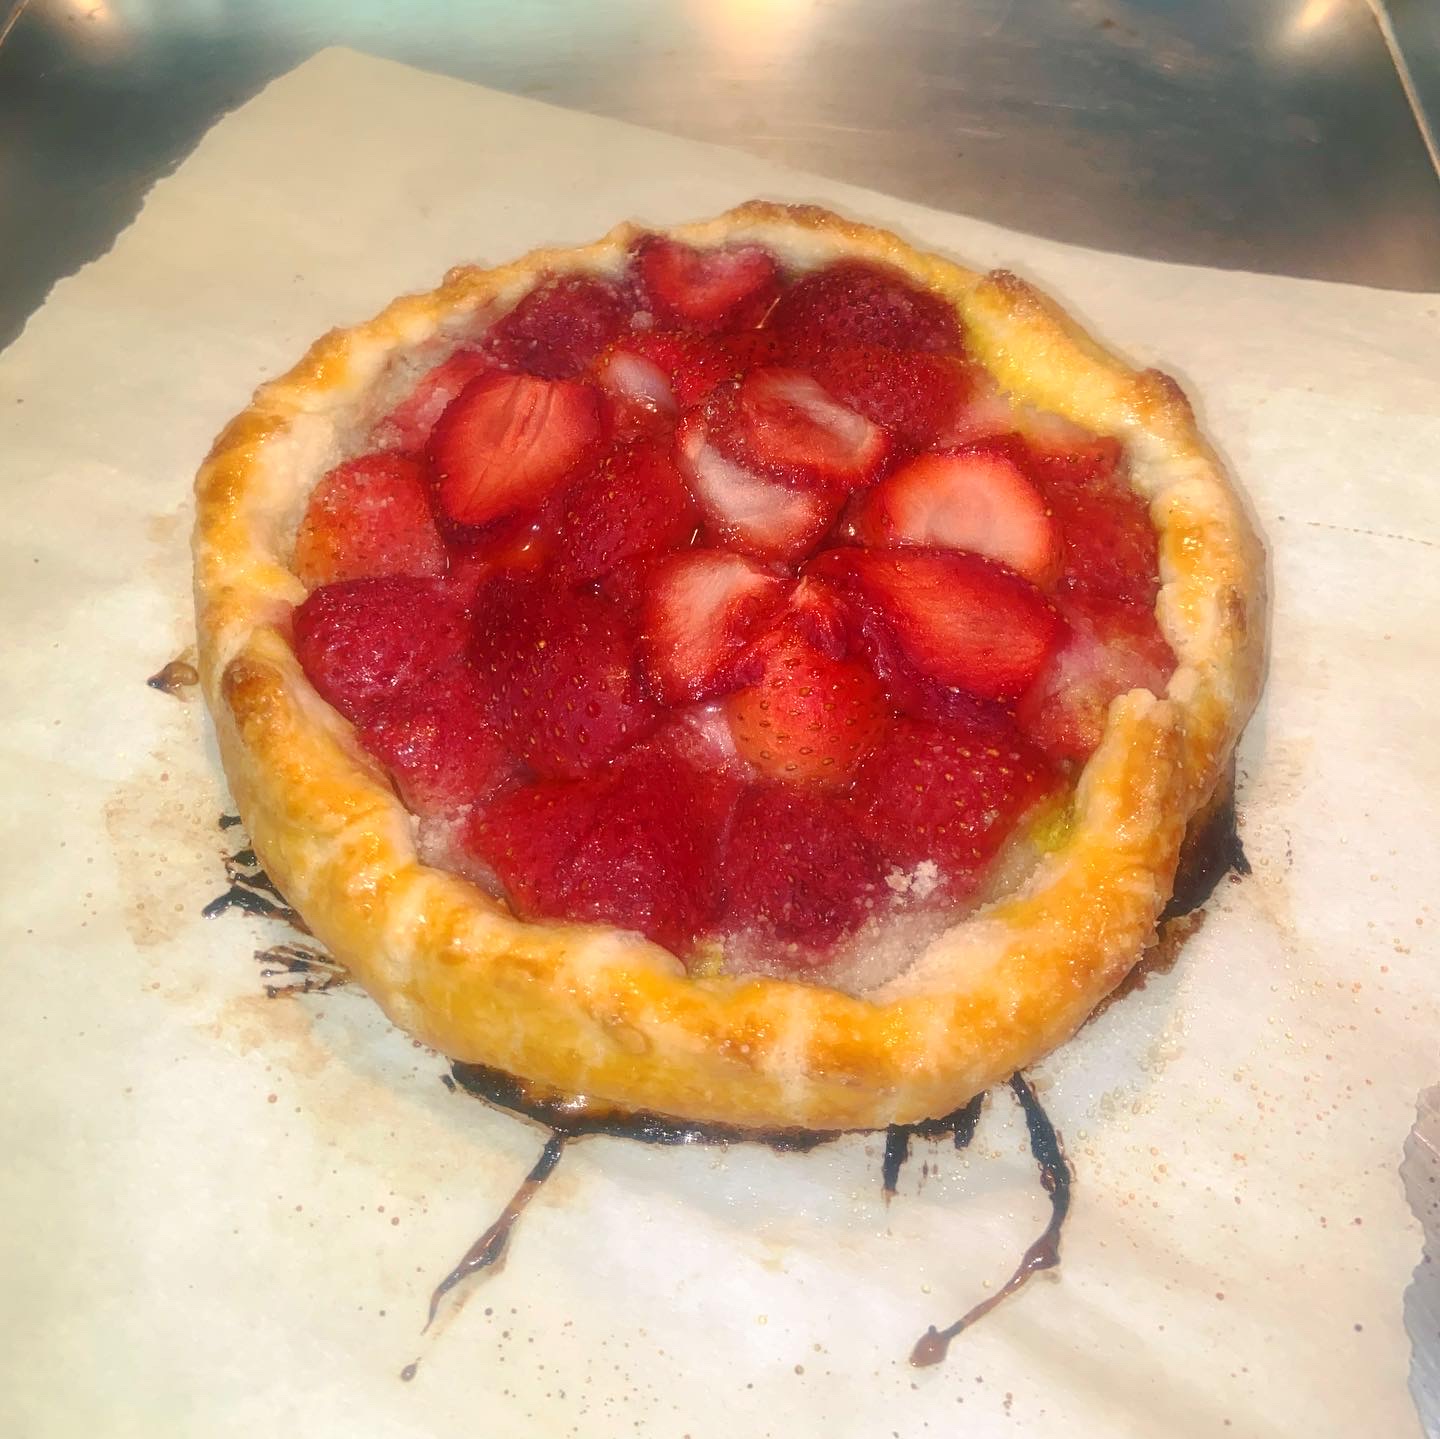
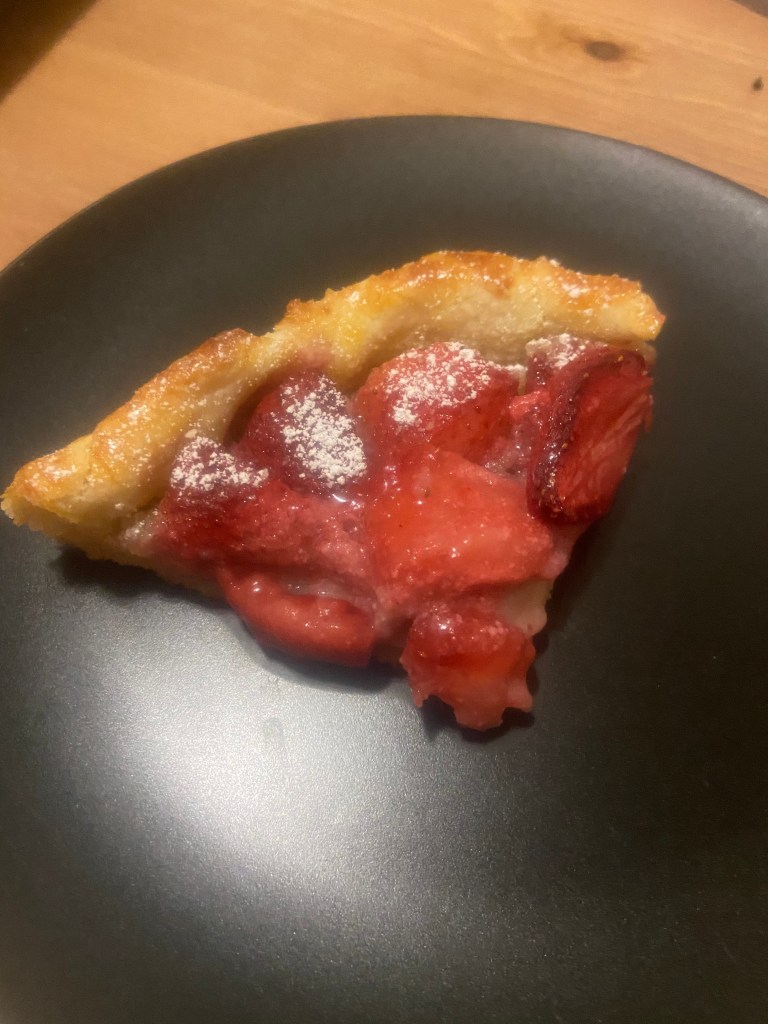
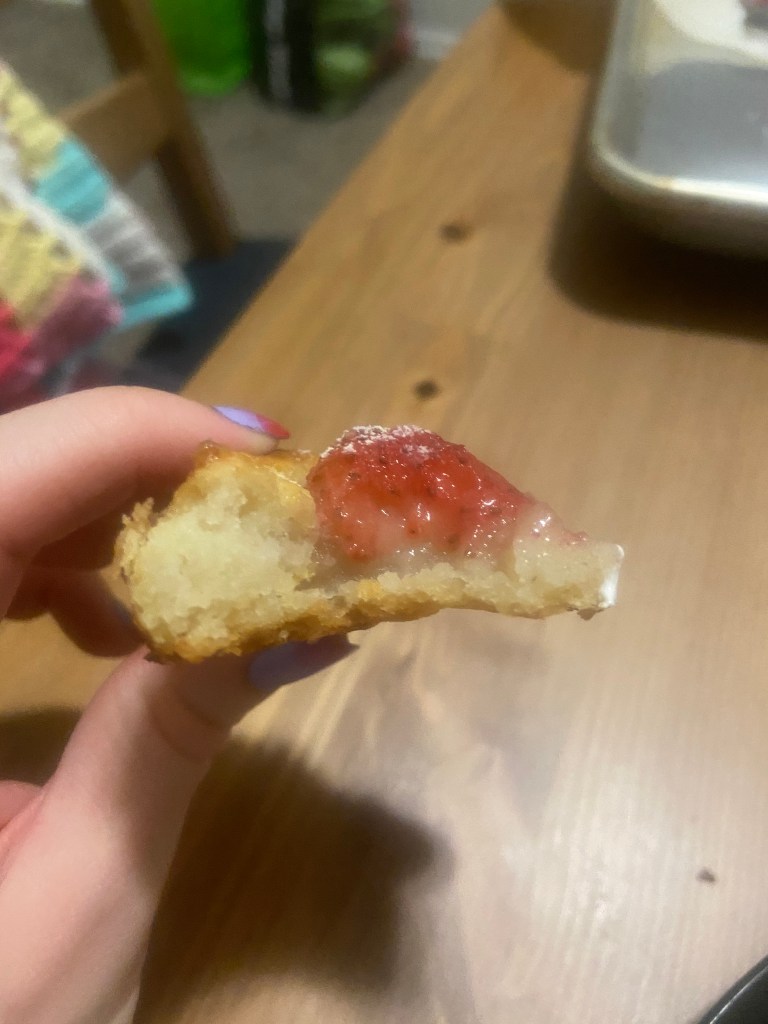
This recipe was SUCH a pleasant surprise. I had the itch to make something I’d never tried, but unfortunately baking supplies are limited. I do, however, have a huge bag of frozen strawberries! I was scrolling through my Pinterest searching for strawberry pastries I could make with what I have when I found this bad boy.
I was a little worried since GF pastries can go horribly wrong (no rising, gluey, “stodgy” as the GBBO judges would say). But it was beautiful! I made a half batch for a little mini galette.
The texture was lovely. So moist but crispy on the outside (thanks egg yolk!) I think I need to make more recipes with yogurt because it really gives a great moisture to the dough. It was sweet but not to sweet and absolutely delicious. 10/10 would bake again! I’d be excited to try different fruits and experiment with things to give more variety of texture and flavor. Cream cheese maybe? Or something on top for an added crunch?
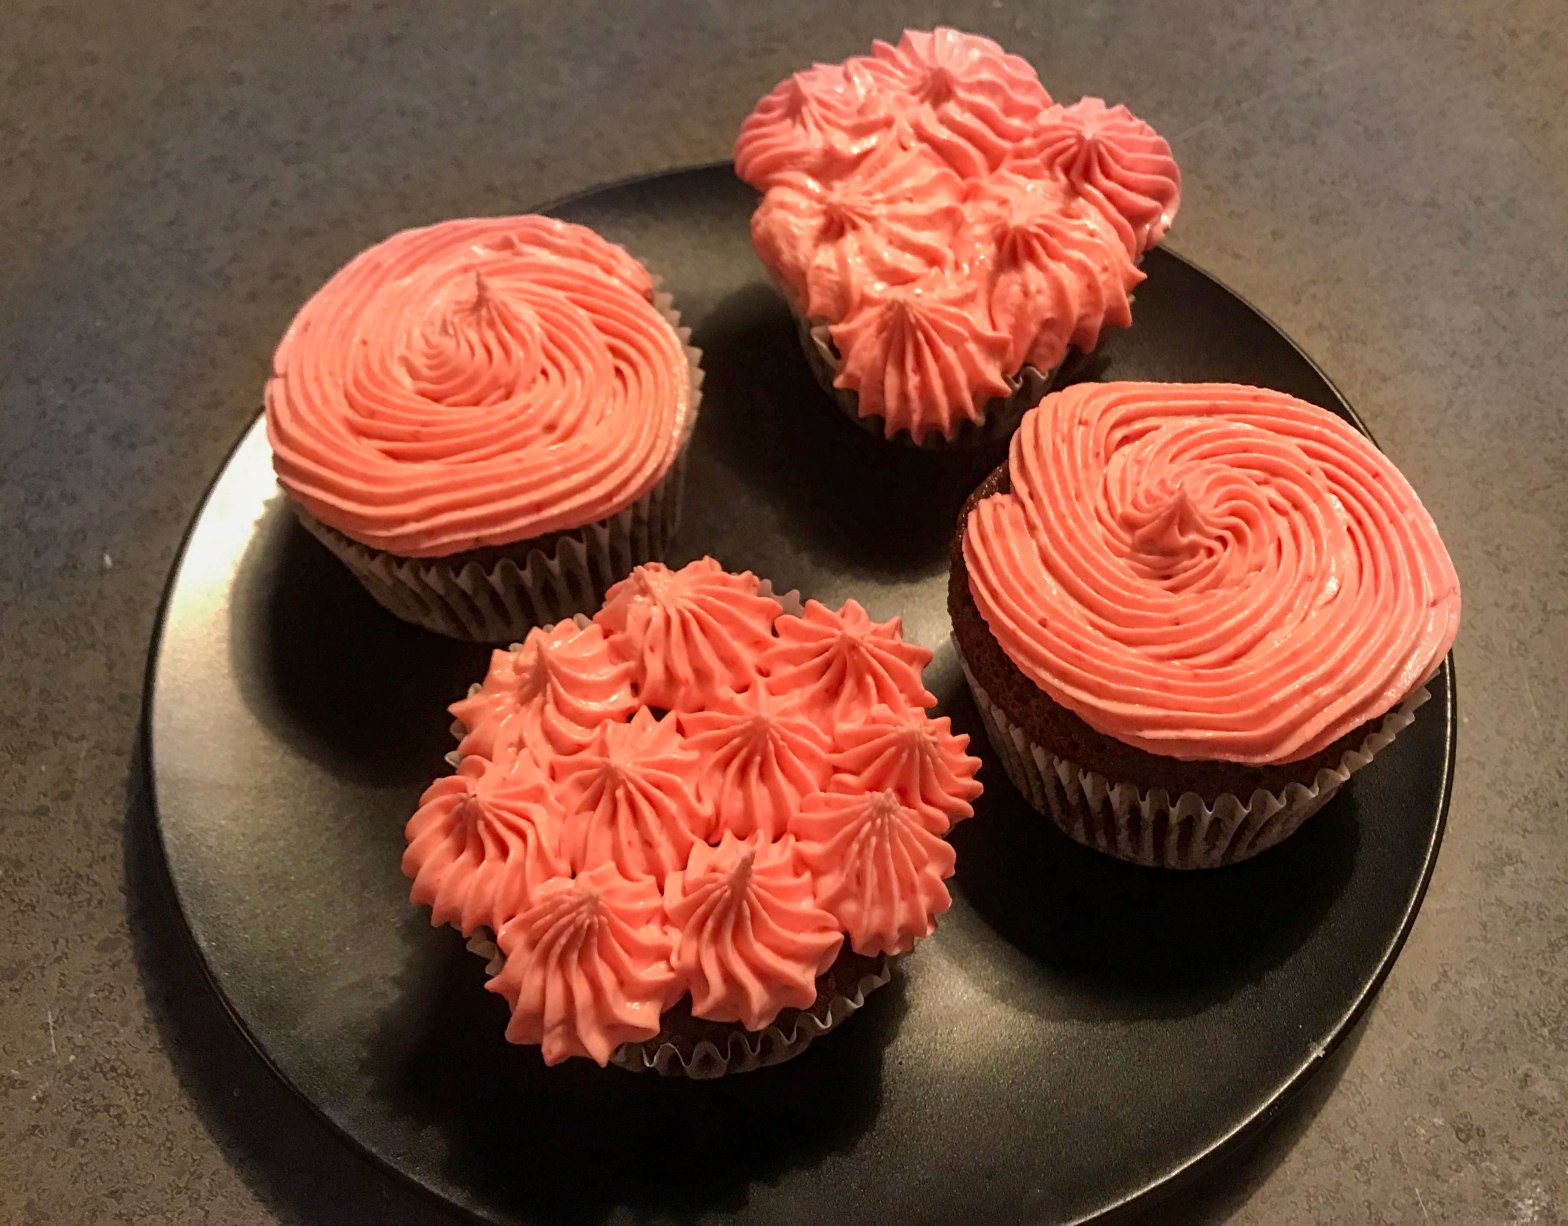
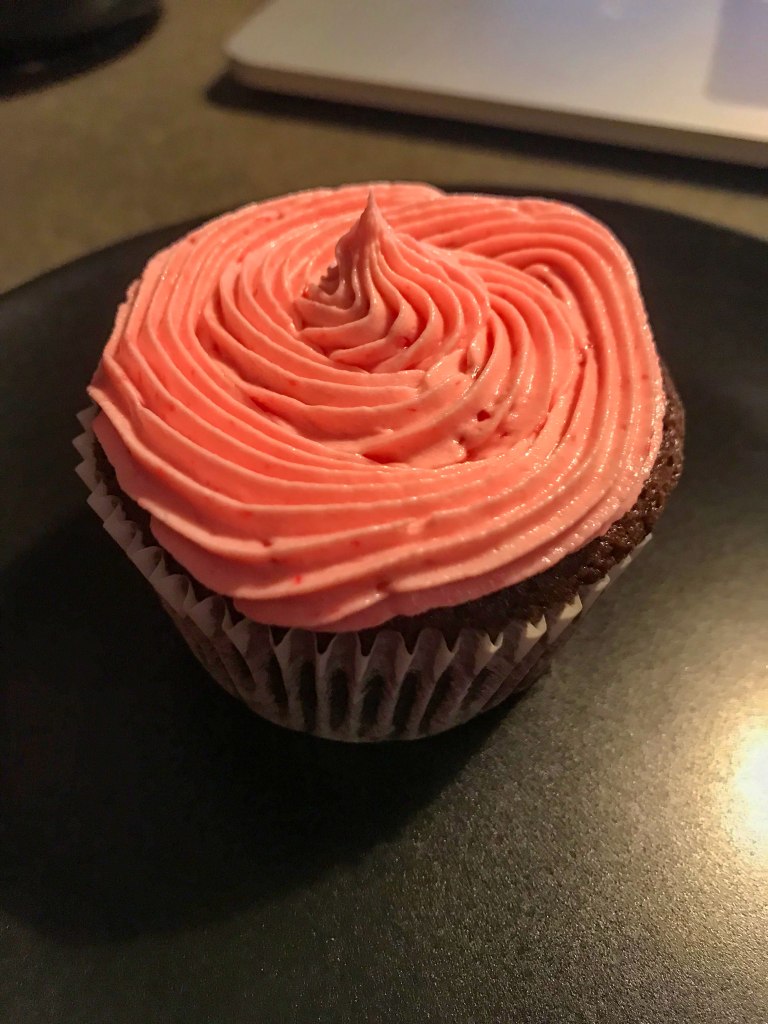
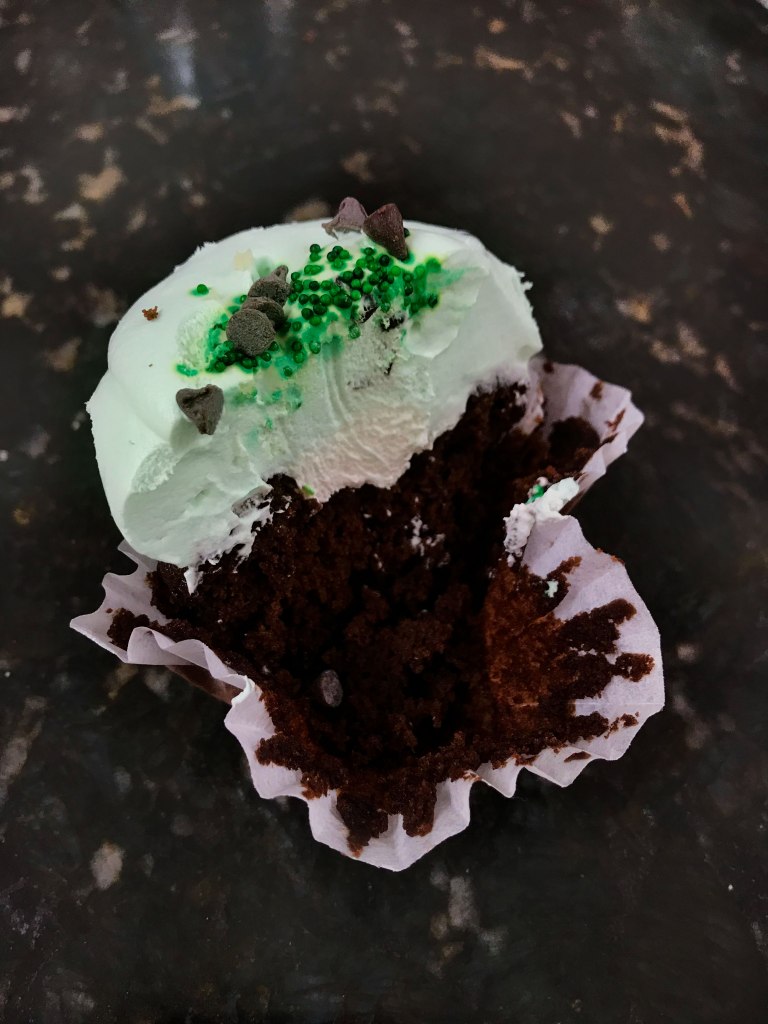
Another experiment mashing together different recipes to satisfy a craving! This time assisted by my lovely roommate who had been wanting to bake with me for a while. We spent some time scouring the internet for easy recipes that combined chocolate cake and fruit before settling on this experiment in deliciousness.
SUPPLIES:
2 Cupcake Tins
Cupcake liners
Rice
CAKE:
2 cups 1 to 1 flour (I used Bob’s Redmill)
2 teaspoons baking powder
2 teaspoons baking soda
1 teaspoon salt
2 cups sugar
2 cups water
4 oz unsweetened chocolate, grated, chopped or broken in pieces
6 Tablespoons butter, cubed
1 teaspoon vanilla extract
2 eggs, lightly beaten
FROSTING:
1 cup raspberries, frozen or fresh (I used frozen)
3 tbs lemon juice
1 lb confectioner’s sugar
1 cup butter, room temperature
1. Preheat the oven to 350 degrees.
2. In a large bowl sift in flour, baking powder, baking soda and salt and set aside. In a medium saucepan, mix the sugar and water and bring to a boil to dissolve sugar.
3. Pour mixture into a large bowl and add the chopped chocolate and butter. Let sit stirring occasionally until the chocolate has melted. Once chocolate has melted, beat for about 1 minute with electric mixer.
4. Mix in vanilla and stir with a spoon. Let mixture cool for 5-10 minutes.
5. In a small bowl beat the eggs. Add eggs to chocolate mixture and beat on medium until combined. Add the dry ingredients and beat until smooth.
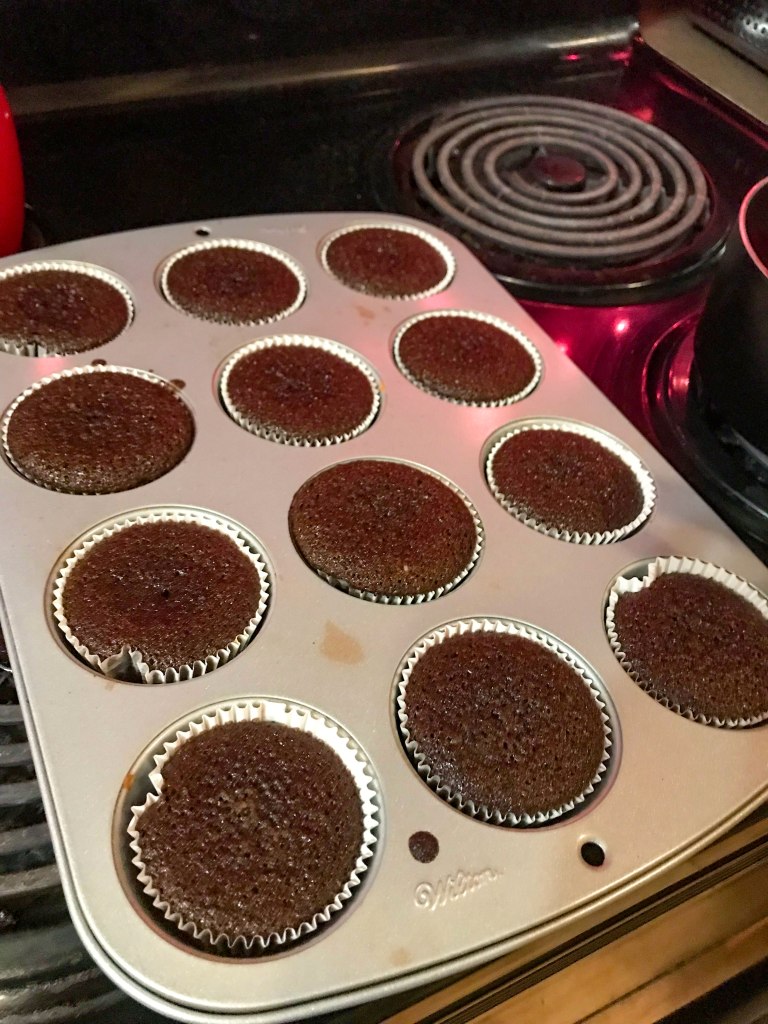
6. Add a little bit of rice to the bottom of each cupcake tin. This will help absorb extra oil and let the wrappers come off much more easily. Add cupcake liners. Distribute the batter evenly.
7. Bake for 25 minutes or until a toothpick comes out clean. Keep an eye on them because they might bake faster. Let cool and start on the frosting.
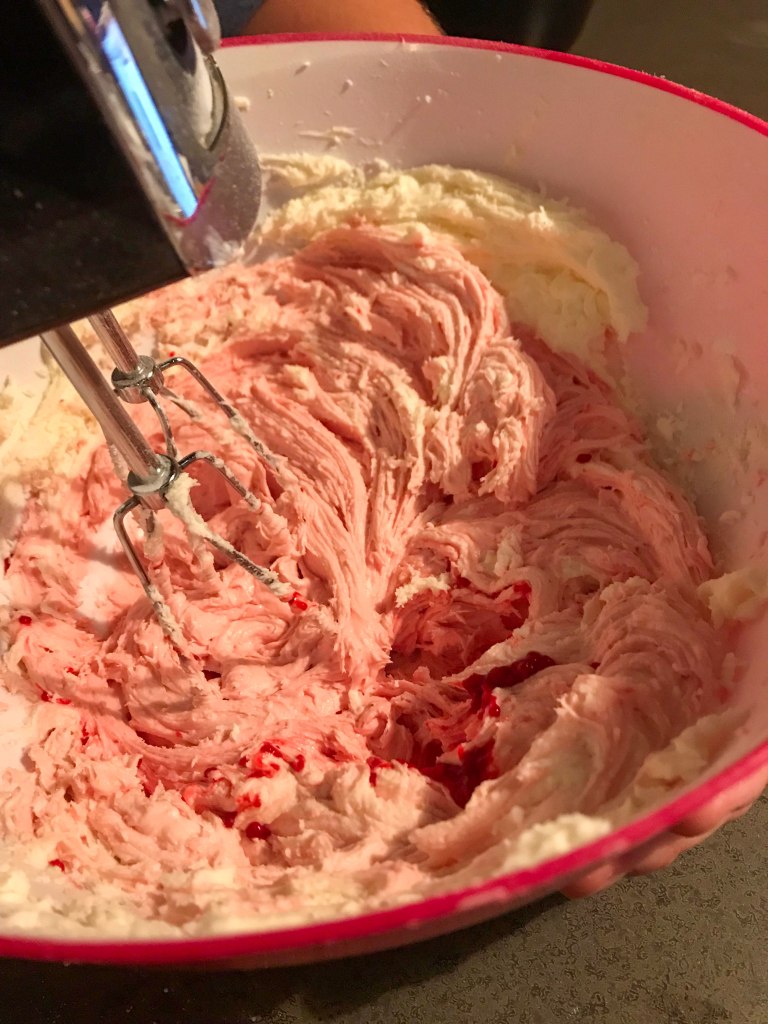
8. Add raspberries and lemon juice to a saucepan over medium heat. After the mixture heats up for a few minutes, mash the raspberries then allow it to simmer for about 10 minutes.
9. Strain mixture into a bowl. Cover and chill.
10. Cream the room temperature butter for a few minutes.
11. Beat in the confectioner’s sugar and add in a tablespoon at a time of the raspberry reduction until the desires color and consistency is reached. I ended up using most of it.
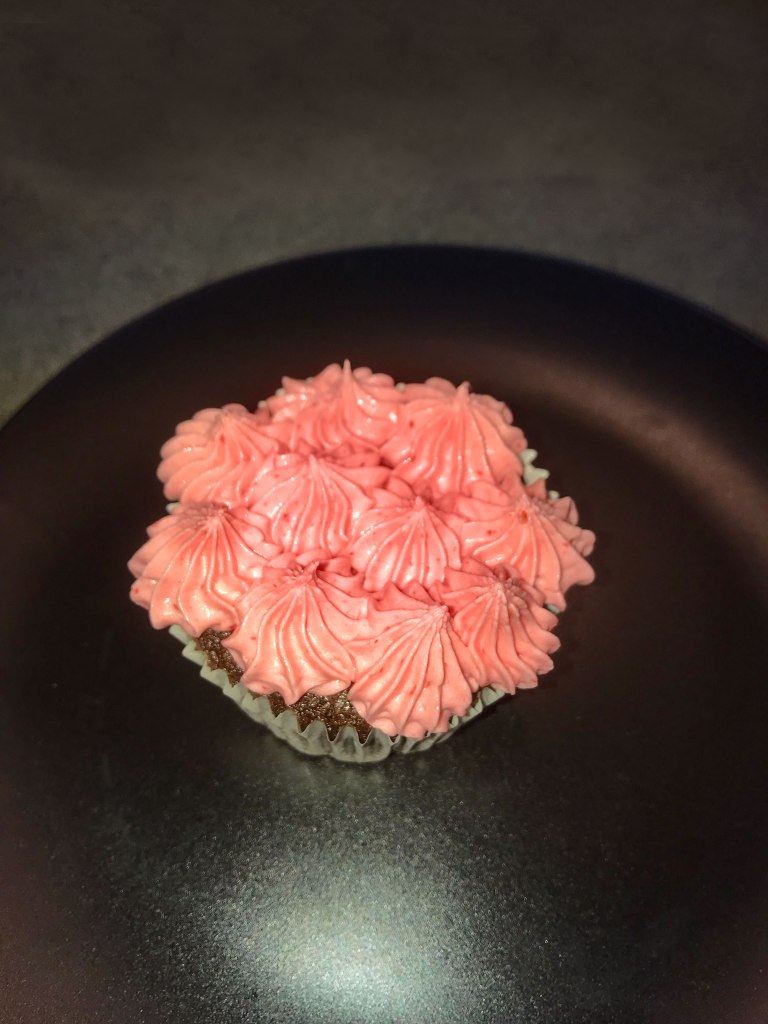
12. Once cupcakes are cool, fill a piping bag and frost to your hearts content!
MY TAKEAWAYS:
I am reasonably happy with these cupcakes. It’s a new cupcake recipe and it definitely didn’t fluff up like a “regular” cupcake. The batter was very liquidy and the cupcake much more moist than expected. It didn’t taste bad, but was an unexpected outcome. They weren’t difficult to make though!
The frosting was pretty tart with the raspberry and the lemon. This ended up being an excellent complement to the richness of the cupcake. It was easy to use and achieved a great pink color without any dye.
Overall, I would make these again, but use a different cupcake recipe. I would also be interested to experiment with different naturally fruit flavored buttercreams!
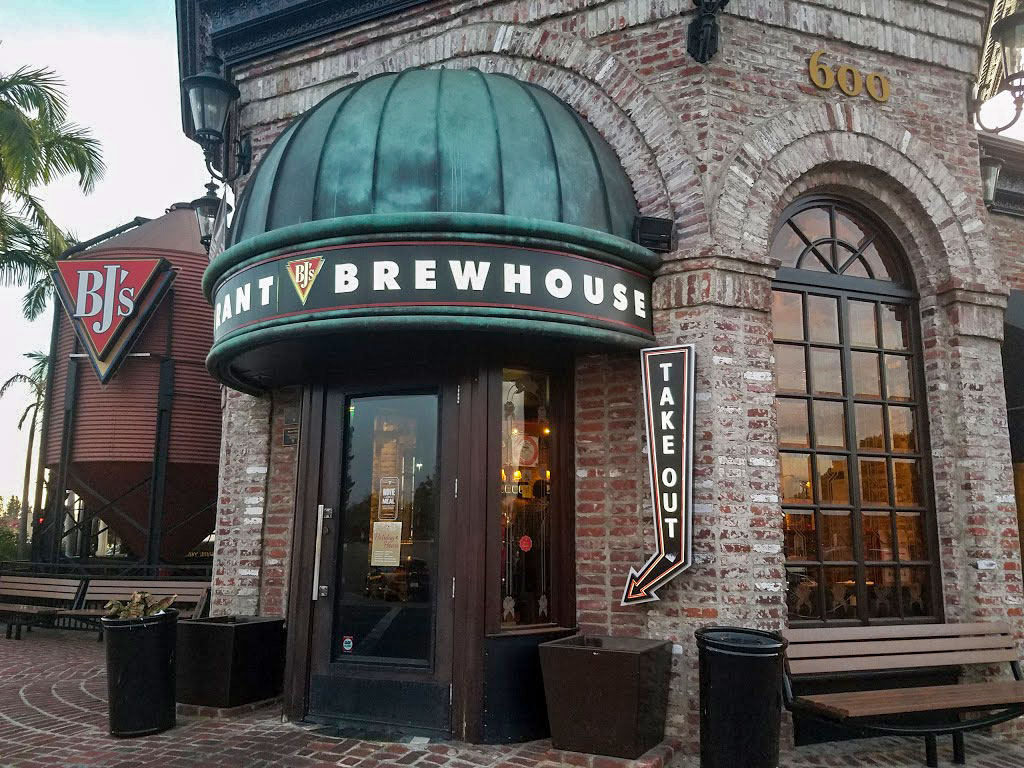
A short but sweet blog post to tell everyone about my newest discovery! We were headed to BJ’s for lunch and I’d never been, but I dutifully scoured the menu for gluten free. I’d been hearing about the BJ’s pazookie (pizza cookie) for a while, but I never thought that they would have GF. But low and behold what was on the menu!
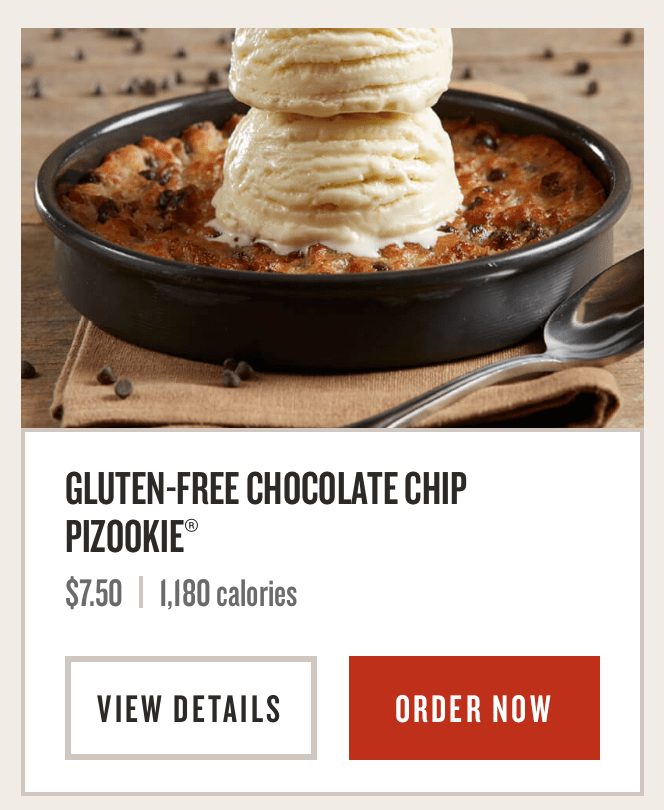
A pazookie is a skillet cookie, typically chocolate chip, topped with melty vanilla ice cream. Super high calorie but so worth it.
Food wise, I got the broccoli and cheddar soup (which was yummy!) and some french fries (which I would NOT recommend because I think they are gluten-y). They seemed relatively knowledgeable about GF and had everything marked, but sometimes it was a little confusing.
My main focus, however, is this gluten free treat. Because I was with two friends, we ordered the Pazookie Trio (essentially 3 and they let us make one of them gluten free. This let me get a mini pazookie as opposed to the full sized.
This pazookie is so delicious! It is gooey and just baked so it’s warm enough to melt the ice cream but not too hot to burn your mouth. The combo of the creamy vanilla and the chocolate chip is to die for. 10/10 would get again! I’m definitely going to try and make a homemade version soon.
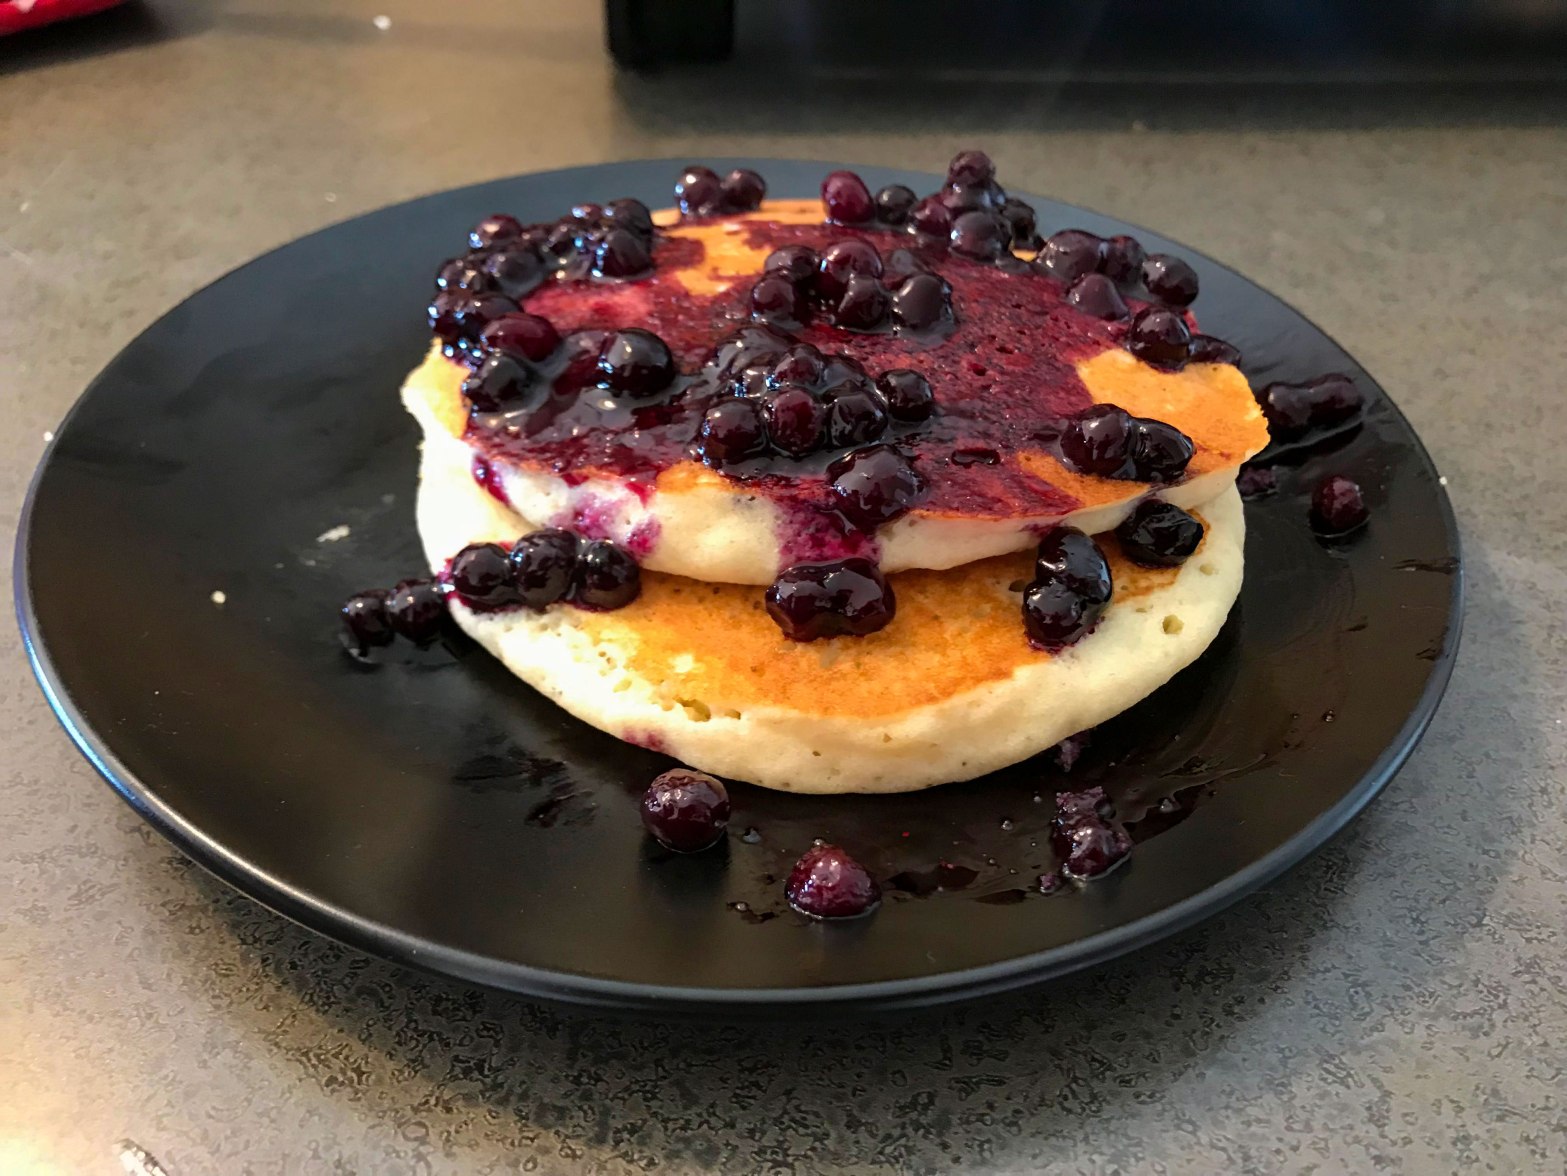
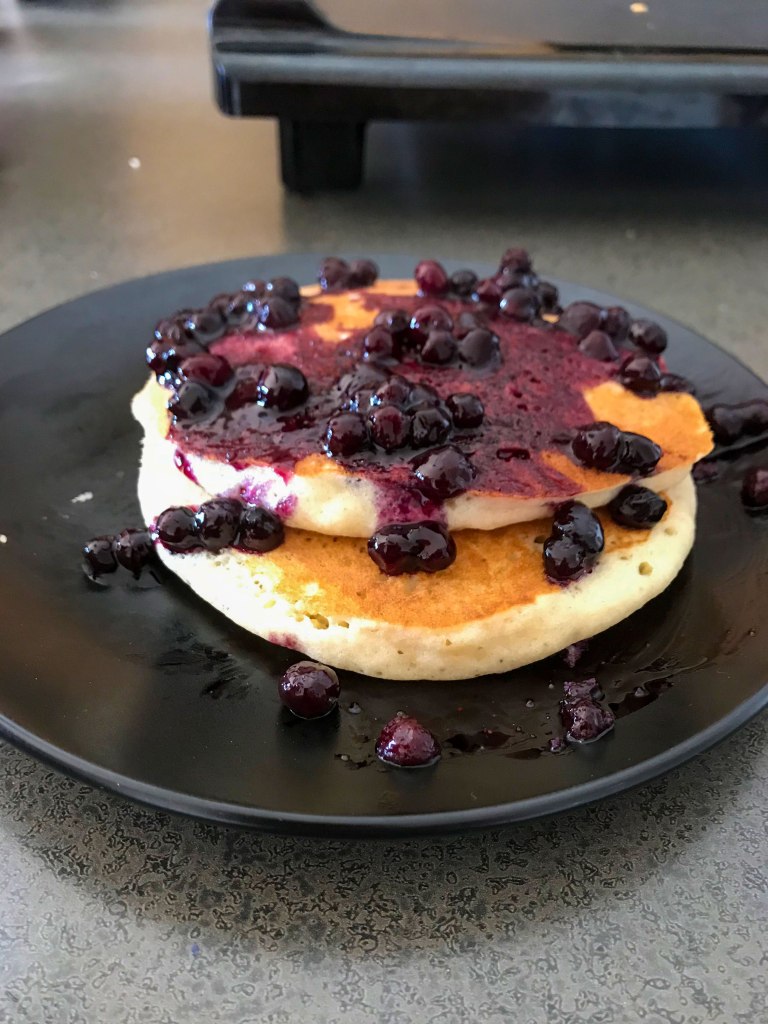
Time and time again my pancakes come out thin, runny and sad. The recipe on the back of the GF Bisquick box just wasn’t working for me. I found some advice on Pinterest and (through trial and error) have created this one of my own. Then I scoured the internet for a blueberry sauce recipe and the rest is history.
PANCAKES:
1 1/4 cup Gluten Free Bisquick
1 cup milk
2 eggs
2 Tablespoons melted butter
1 teaspoon vanilla
4 Tablespoons pure maple syrup
SAUCE:
1 1/2 cups blueberries, fresh or frozen
1 tablespoons lemon juice
1/6 cup granulated sugar
1/6 cup water
1/2 tablespoon cornstarch
1 tablespoons water
1. Start with the blueberry sauce because it will take a little while. Add the blueberries, lemon juice, sugar and 1/6 cup water to medium saucepan over low-medium heat.
2. Let the sugar dissolve and bring to a gentle boil to soften the berries while stirring occasionally.
3. In a small cup dissolve the cornstarch in 1 tablespoons of water.
4. Add the cornstarch to the blueberry mixture and stir to dissolve.
5. Gently boil for 5-10 minutes to thicken the sauce. It will continue to thicken as it cools.
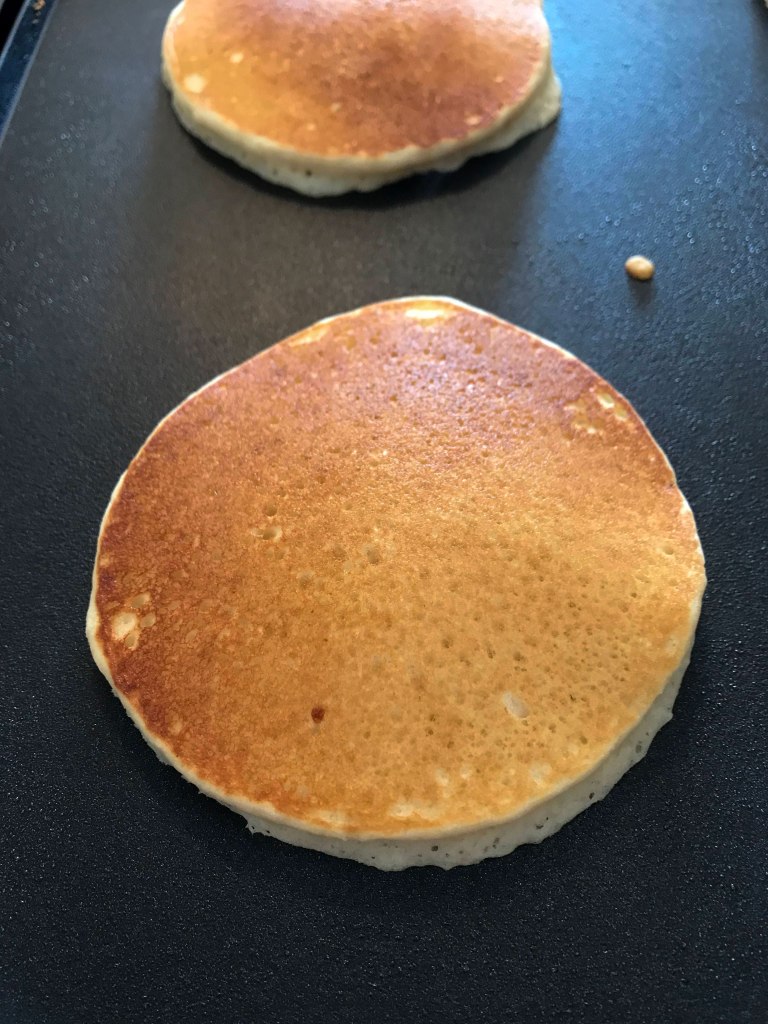
6. Remove from the heat and get started on your pancakes by pre-heating a large non-stick skillet on the stove top over medium-low heat or electric skillet to around 350.
7. Add all pancake ingredients to a mixing bowl. I like to use a large liquid cup measure because it makes pouring the pancakes 10 times easier.
8. Mix with whisk or electric mixer until completely combined.
9. Spray your baking surface and drop batter onto skillet.
10. Cook until the edges are firm and the tops are full of bubbles.
11. Flip over and cook the other side. Drizzle or drench in blueberry sauce and enjoy!
MY TAKEAWAYS:
I cannot express how delicious these are. The pancakes are actually light and fluffy! Unheard-of for GF. The sauce is the not too sweet and not too sour but adds a great extra flavor to the pancake. Plus the recipe is super easy! 10/10 would recommend.
I knew I’d be traveling to California so, as I do any time I visit somewhere new, I immediately started researching GF options nearby. If you stay tuned, you’ll see my thoughts on a 100% GF bakery at some point soon. But for today, it’s cupcake time!
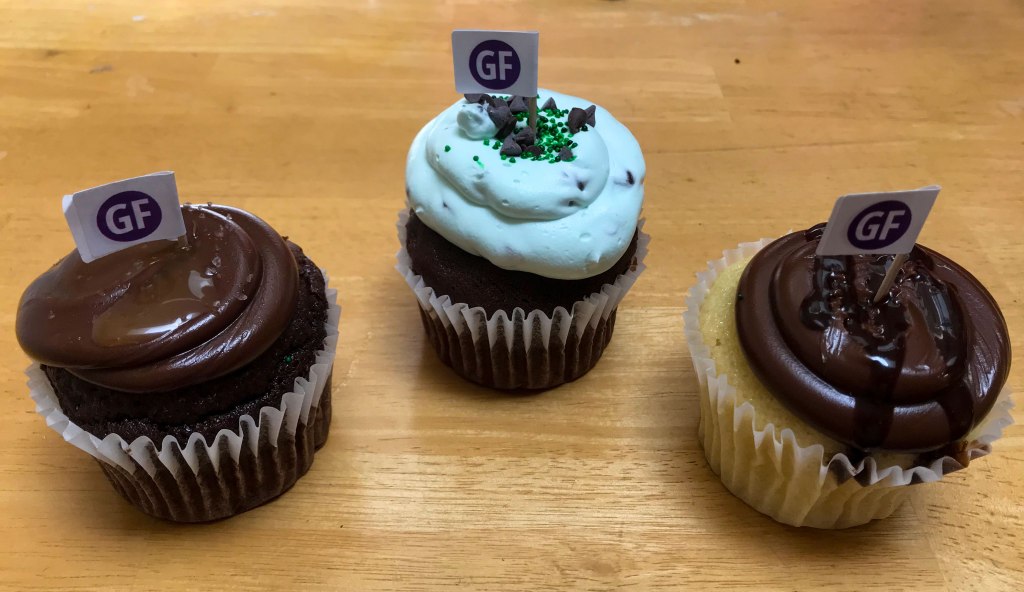
In one of my Google searches, I came across a cute looking little shop called Patty’s Cakes and Desserts in Fullerton, CA. Where some cupcake shops offer one or two GF options, their website appears to offer 20 flavors! I soon realized why. The way this shop works is that they make massive batches of vanilla and chocolate cupcakes and after you order a certain cupcake, then they ice it. This allows for the 20 different options of GF based on two cupcake bases. Each cupcake is $3.50. A little pricy, but worth it to try these.
So many options, but, since I have to save room for other GF treats later this week, I had to narrow it down to three to try. And they all come with a sweet little GF flag on them!
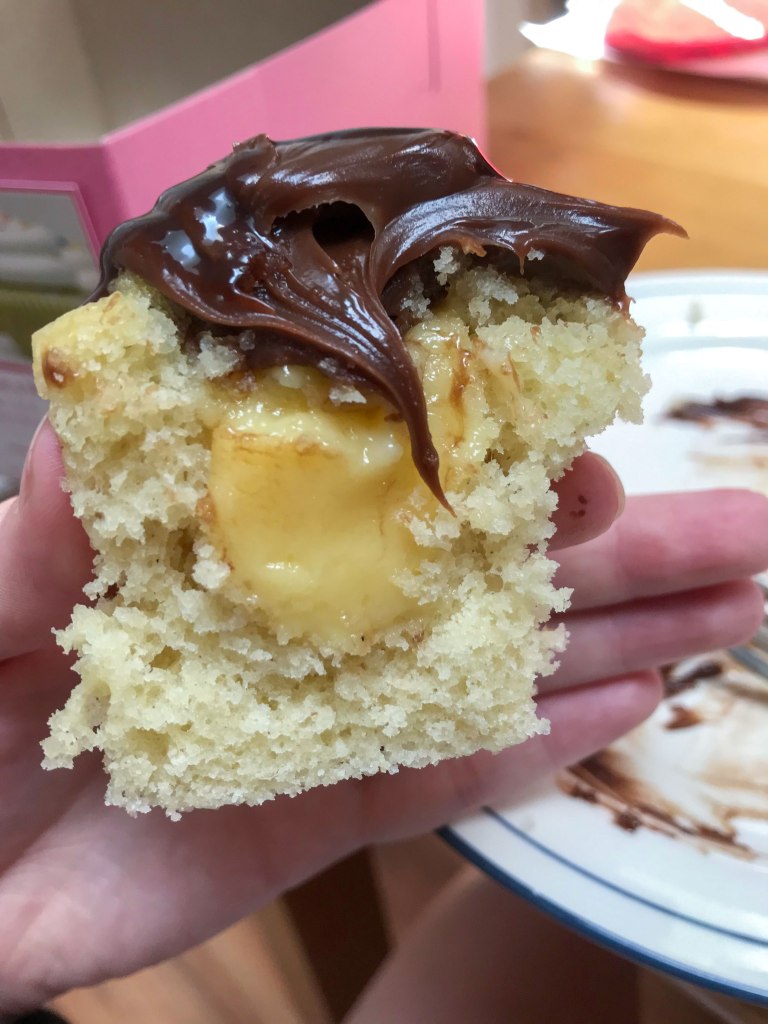
First up, the Eclaire Cupcake! This is a Gluten-Free White Cake based cupcake filled with Vanilla Cream and topped with fudge frosting. The frosting is creamy, deeply fudge and delicious. The filling is sort of like custard and also very tasty. The cupcake base is alright. It’s mildly dry with a not-quite-vanilla flavor that’s kind of hard to describe. But the filling and topping help combat the dryness to make this a pretty yummy cupcake overall.
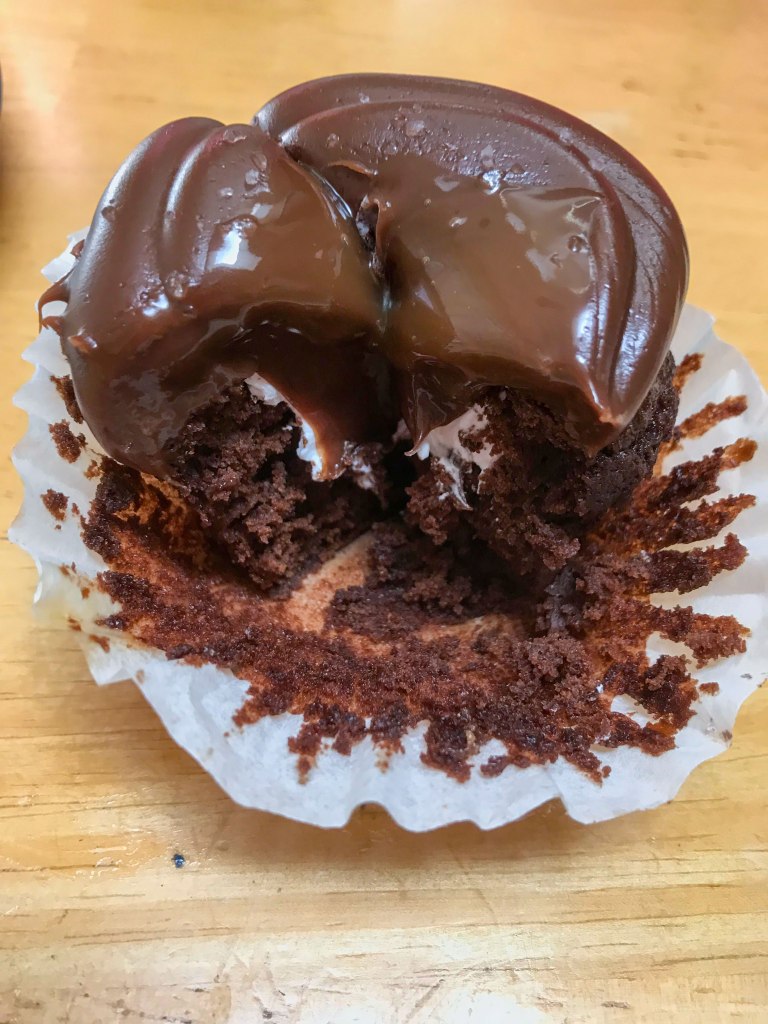
Next, the Salted Caramel Cupcake. This is a Gluten-Free Chocolate Cake based cupcake topped with Chocolate Fudge frosting, and a caramel & sea salt sauce. It’s also filled with some sort of vanilla creme. The salted caramel sauce is amazing. Just the right amount of salt to give a real depth of flavor. As with the Eclair cupcake the chocolate is super rich and fudgy. My only complaint is that I don’t really need the creme filling. Maybe it’s meant to break up the chocolate overload? It’s alright, but definitely not necessary.
Lastly, the Mint Chip Mousse Cupcake. This is a Gluten-Free Chocolate Cake based cupcake with a fluffy Mint Chip Mousse and mini chocolate chips on top. The mousse tastes almost exactly like mint chip ice cream. It is light and creamy and very easily meltable. (If you end up getting cupcakes to go, I would recommend sticking them in the fridge for a little while before eating. It makes them much easier to handle!) The cupcake is the same base as the Salted Caramel but without the filling. Tasty and less dry than the vanilla. A little difficult to get a solid bite because of how oozy the mousse is.
Overall, this is a solid find. The cupcake base themselves were alright. Not necessarily better than something I could make at home. But this shop gets big bonus points for the pure amount of options they offer. If I lived nearby, I’d be sure to try every flavor! They also offer custom gluten free cakes and gluten free mini cupcakes if you order ahead.
I’ve been craving something sweet and needing an excuse to use these super cute cookie cutters a friend gave me several Christmases ago. Thus gingerbread in the summer! I halfed the recipe for ease.
INGREDIENTS:
2/3 cup canola oil
1/4 cup blackstrap molasses
1 cup dark brown sugar
2 eggs
3 cups 1 to 1 gluten free flour (I used Bob’s Red Mill this time)
2 tsp. ground cinnamon
2 tsp. ground ginger
1 tsp. ground cloves
1 tsp. baking soda
1/2 tsp. salt
1. Whisk together the flour, spices, soda and salt and set them aside.
2. Using a hand mixer, mix the oil, molasses and brown sugar.
3. Mix in the eggs, one at a time.
4. Slowly stir in the dry ingredients.
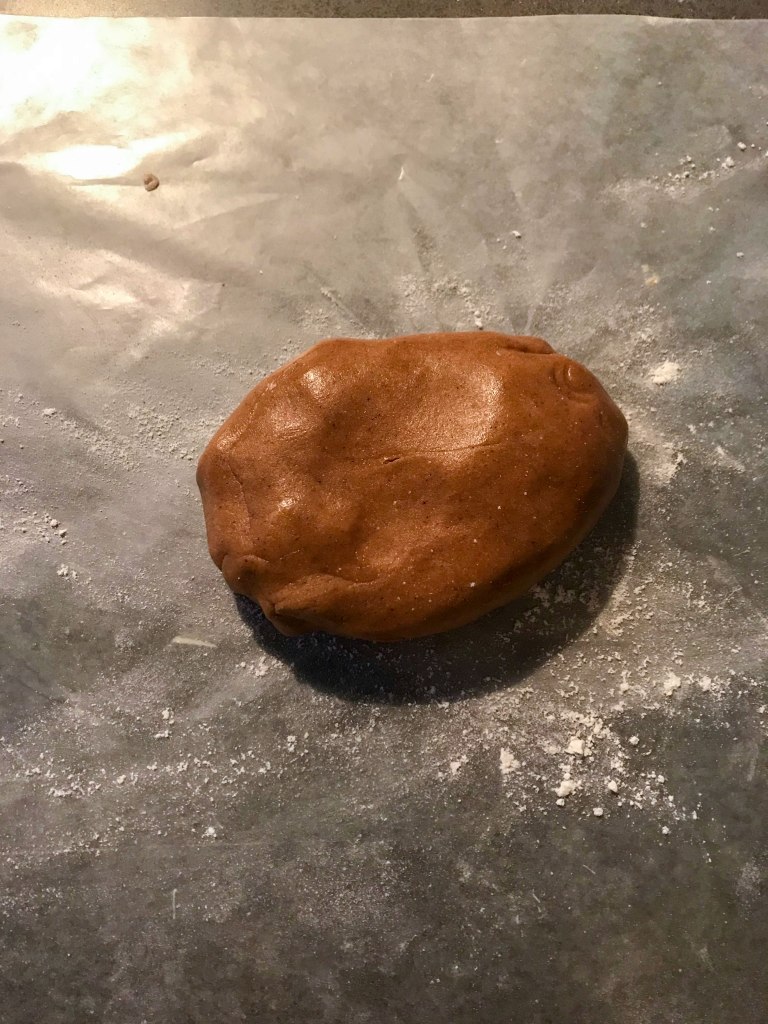
5. The dough will still be very sticky. Dump it out onto a heavily floured surface and with floured hands, work in more flour with your hands until the dough is no longer sticky. I find its easiest to really cover your hands in flour and then pat the dough and push gently until it incorporates rather than digging your hands in (that’s just messy).
6. Wrap the dough in plastic wrap and refrigerate for at least 3 hours.
7. Preheat oven to 350 degrees and cover a cookie sheet with parchment paper.
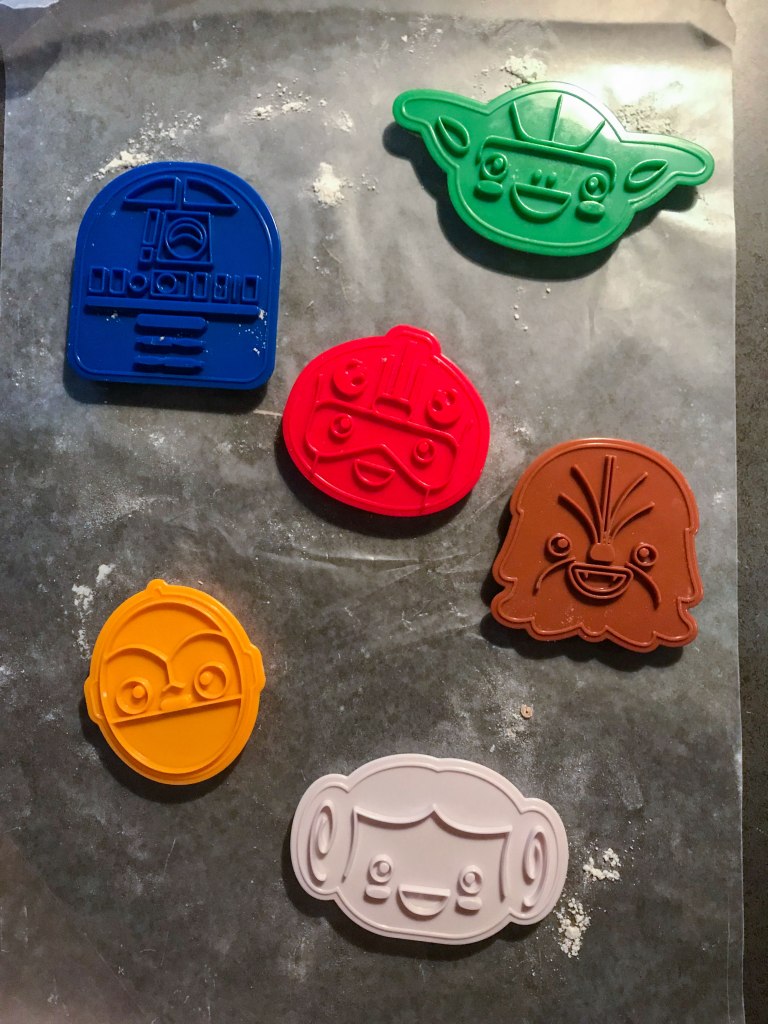
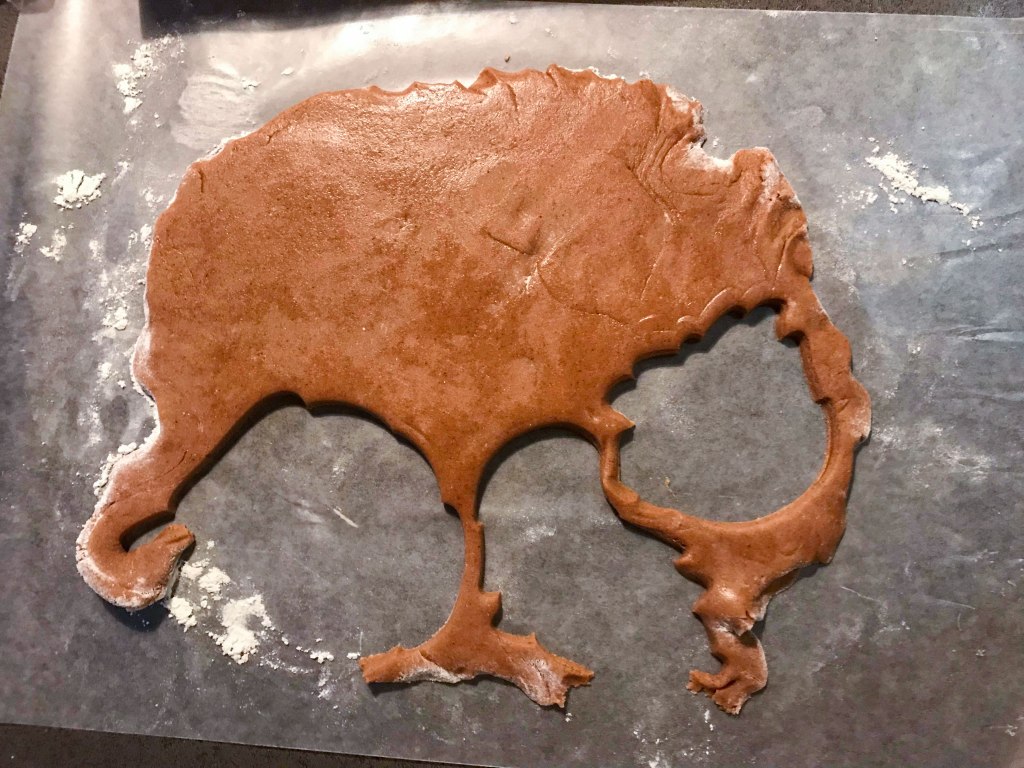
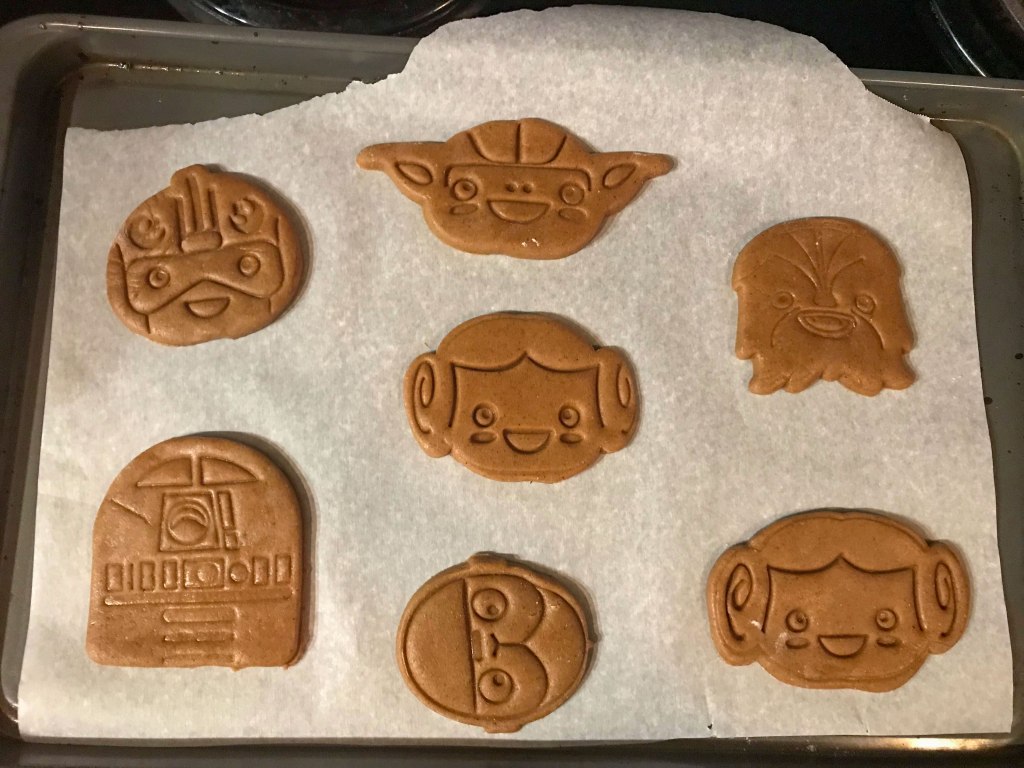
8. On a lightly floured surface, roll out dough 1/4 inch thick. Then it’s time to bust out the cookie cutters! I’ve been dying to use these super cute Star Wars themed ones.
They’re really interesting because one side cuts out the shape and the other side punches a design into the cookie. I’d never seen this style of cookie cutter before. It was a little difficult to get the hang of it, but eventually I was rewarded with all six characters in gingerbread form!
9. Bake for 8 minutes until they appear “cracked.”
10. Let cool for 2 minutes before removing.
MY TAKEAWAYS:
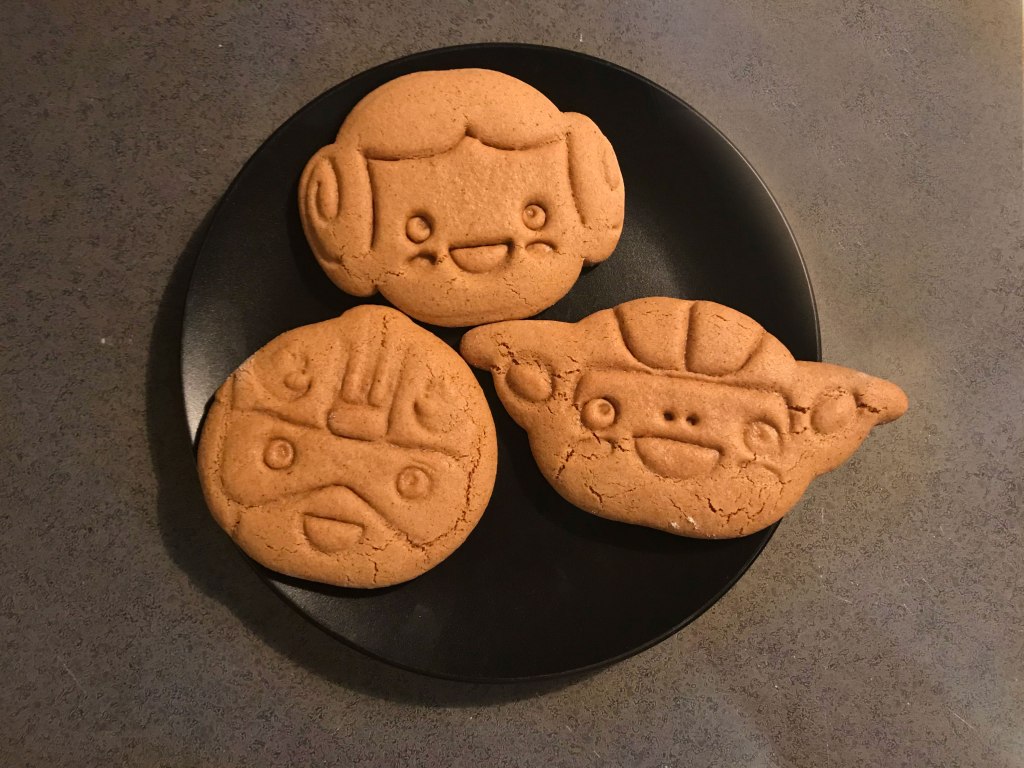
I find that imply substituting a 1 to 1 GF flour often works best with cookies or brownies. Far less room for error! But even so I wasn’t sure if these would turn out soft (as the recipe promised) or rock hard. I was so happy with the texture! “Melt in your mouth” is such a cliche, but it’s true for these cookies. They are soft and entirely too easy to eat.
They also aren’t too sweet. The gingerbread has a nice spice filled taste to it. And they held their shape very well! Even keeping the stamped design.
TL;DR These cookies are a definite triumph. They were spicy, soft and exactly what I wanted them to be without having to make any major adjustments to the recipe. The only thing I’d say is be aware that you will definitely need more flour than the recipe calls for!
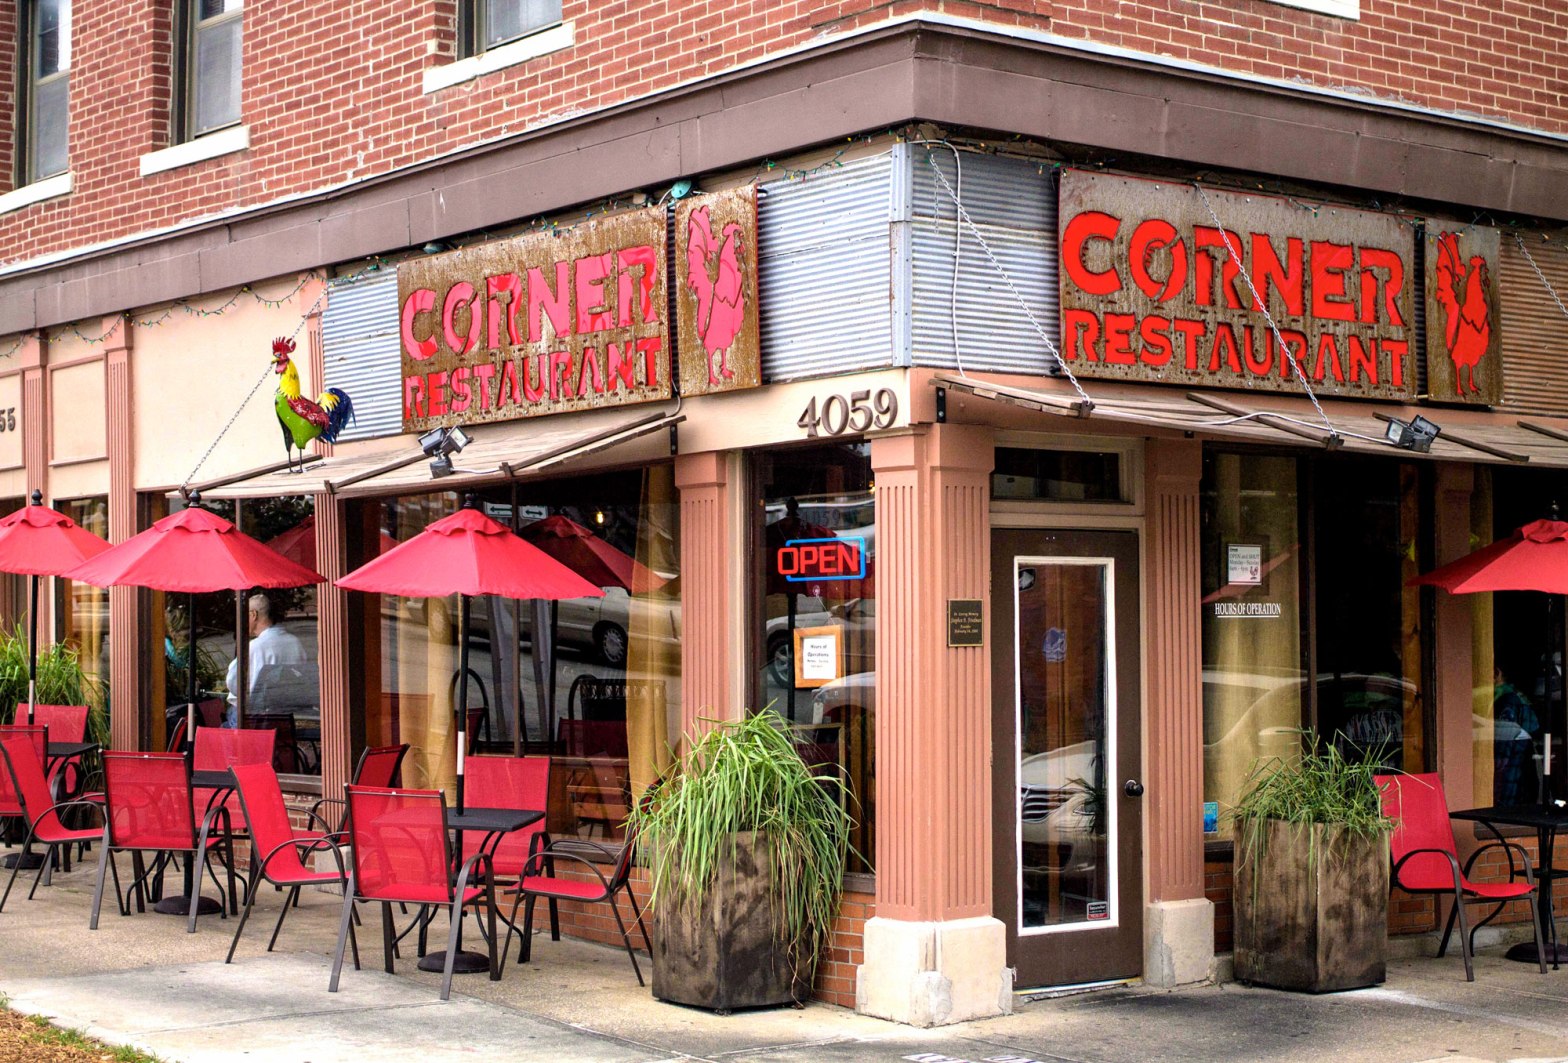
I found myself in Kansas City in the morning desperately in need of breakfast food. I had been craving pancakes so I was delighted when a Google search led me to The Corner Restaurant. It was a little hard to find there menu because I originally clicked on their separate business site. I don’t know what that’s for, but this is their real website.
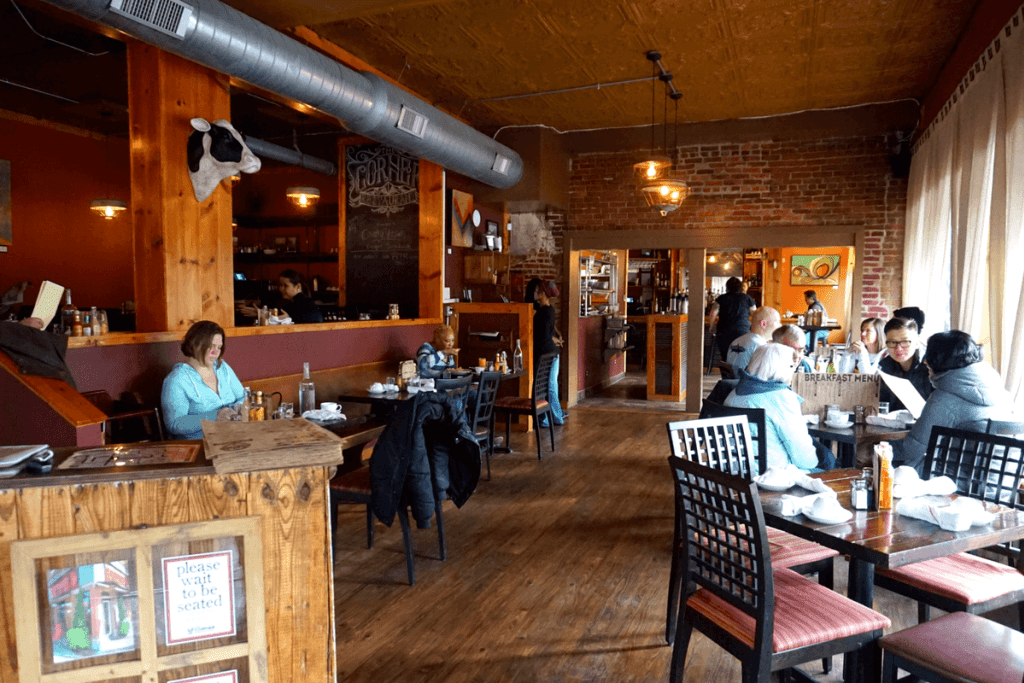
While they don’t have a huge array of GF options, they did have pancakes which was enough to get me through the door. The interior is really sweet. Lots of wood, exposed brick and pipe, and warm lighting. A very cozy feel.
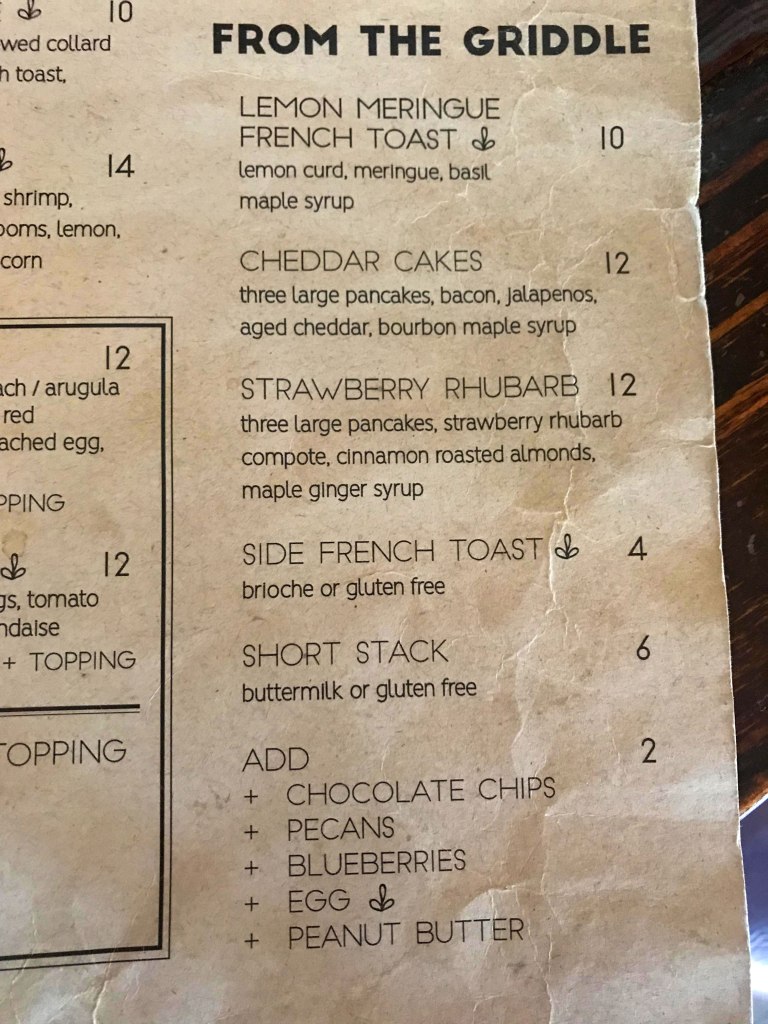
There isn’t a gluten free section on the menu, but the “From the Griddle” section lists gluten free as an option for two dishes. The side of French Toast and the Short Stack. I decided to go for both because neither was particularly expensive. Our server definitely knew about gluten free.
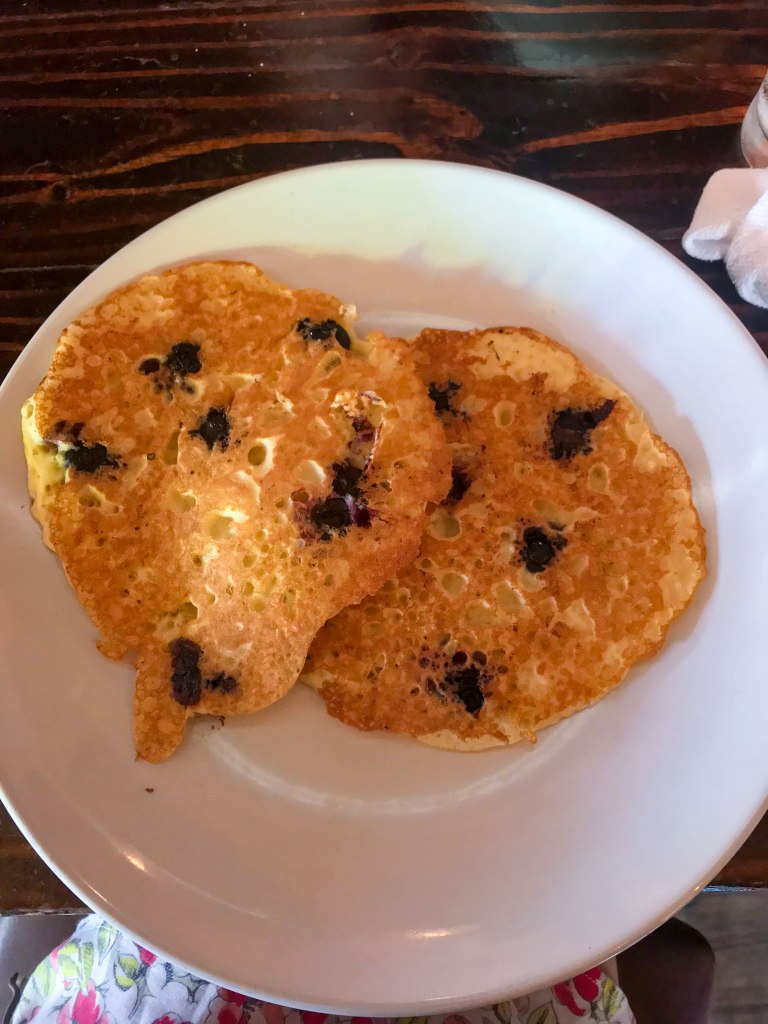
First up, the Short Stack. It looks like I could have added any and all of the toppings, but I had a hankering for blueberry. The pancakes were nice and fluffy and the blueberries were delicious. They came with butter and syrup and were devoured in under (If you read my last pancake post, you know that I like to dunk my pancakes in the syrup container.)
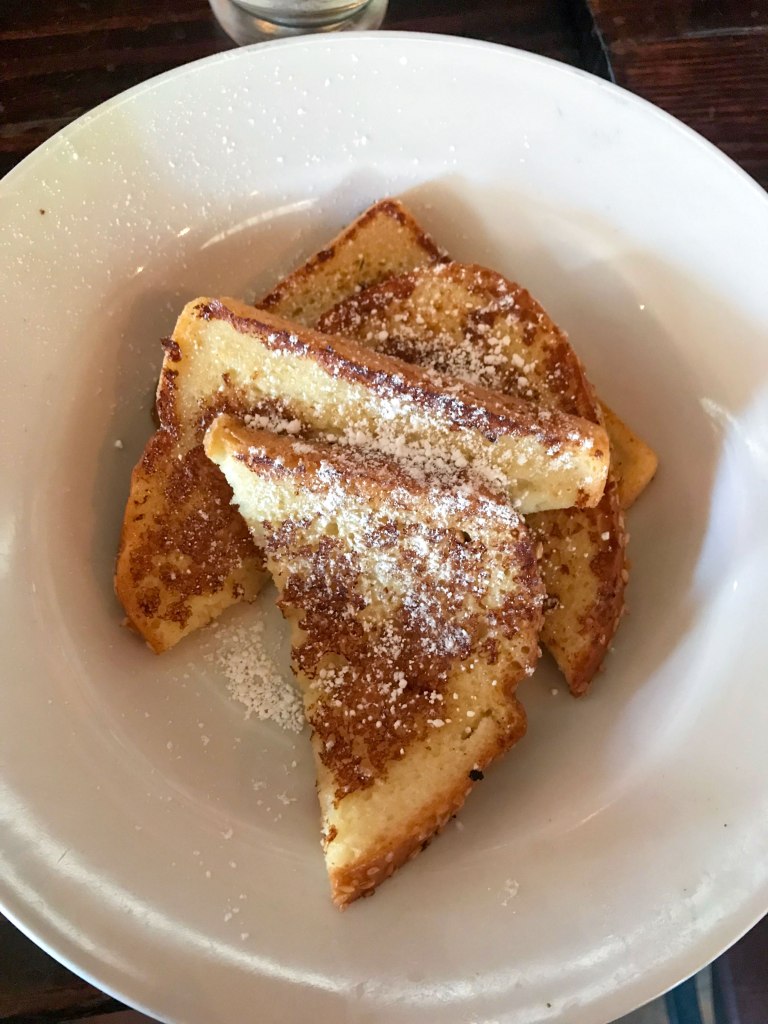
Next, I turned to the French Toast. While the pancakes probably would have been enough for breakfast meal (if not a super filling one) if that was all I ordered, I don’t think the french toast would be. It was very sweetly arranged, but only four half slices of toast. The bread appeared to be their in house GF bread and not specially designed for french toast. This is my guess because it had some sort of seed on the top part of the crust. The french toast itself was not bad, but it was pretty bready. By which I mean that it clearly wasn’t soaked in the egg mixture for very long. It was almost as if the egg was just sprinkled or brushed on the outside because the inside was basically just regular bread consistency. And you could taste it.
It tasted almost a little sour or savory. As if someone used sesame seed bread for french toast (which might be what happened). The taste mostly only showed up when you ate the top half (seed half) of the bread. It wasn’t super sweet or super moist. The additional flavor was odd to me, but not completely off-putting. There wasn’t anything bad tasting about it. It was just a little off.
TL;DR: Overall, I really liked this place. The service was quick and cheap and there was free WIFI. The french toast was so-so, but it definitely satisfied my pancake craving and, if I ever come back, I’d love to try more of their flavors.
Another special bonus? There was no uncharge for gluten free. They charge an additional fee for adding things to your pancakes but GF was the same price as gluten-full.
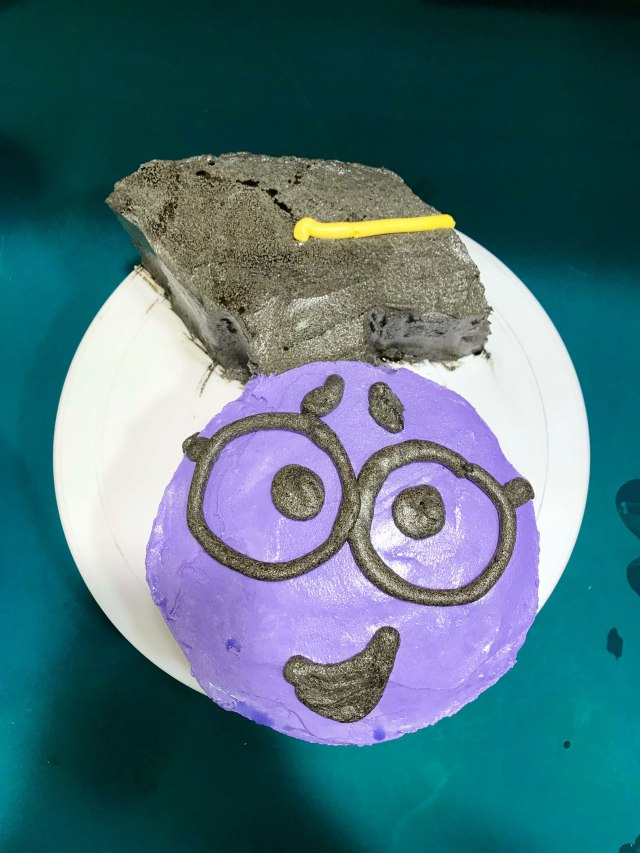
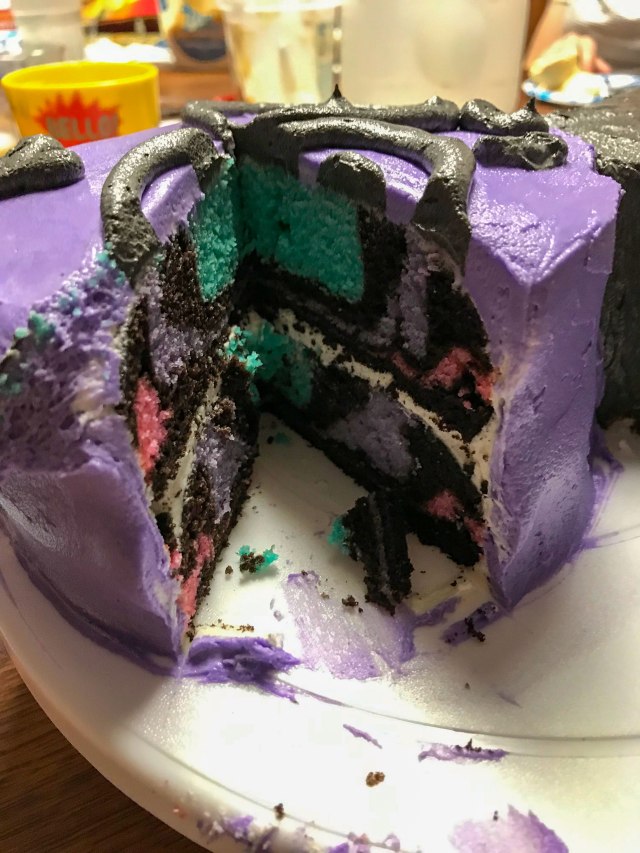
Some context: My youngest brother (whose birthday is in July) is currently fixated on the 2nd Wreck It Ralph movie, Ralph Breaks the Internet. Specifically, the character of Knowsmore (a minor character appearing in less than 2 minutes of the movie). But, nevertheless, he wanted a Knowsmore cake for his birthday. So I decided to use it as an opportunity to experiment a little! I’ve never seen this interior before online so I’m not sure if anyone else has tried it. My brother wanted “Internet and Mr. Knowsmore flavored” so this is my attempt. So without further blathering here’s the recipe. Scroll to the bottom for my post-baking thoughts!
SUPPLIES:
2 6 inch rounds
2 small rectangular pans (I used disposable 8×4 pans from Walmart)
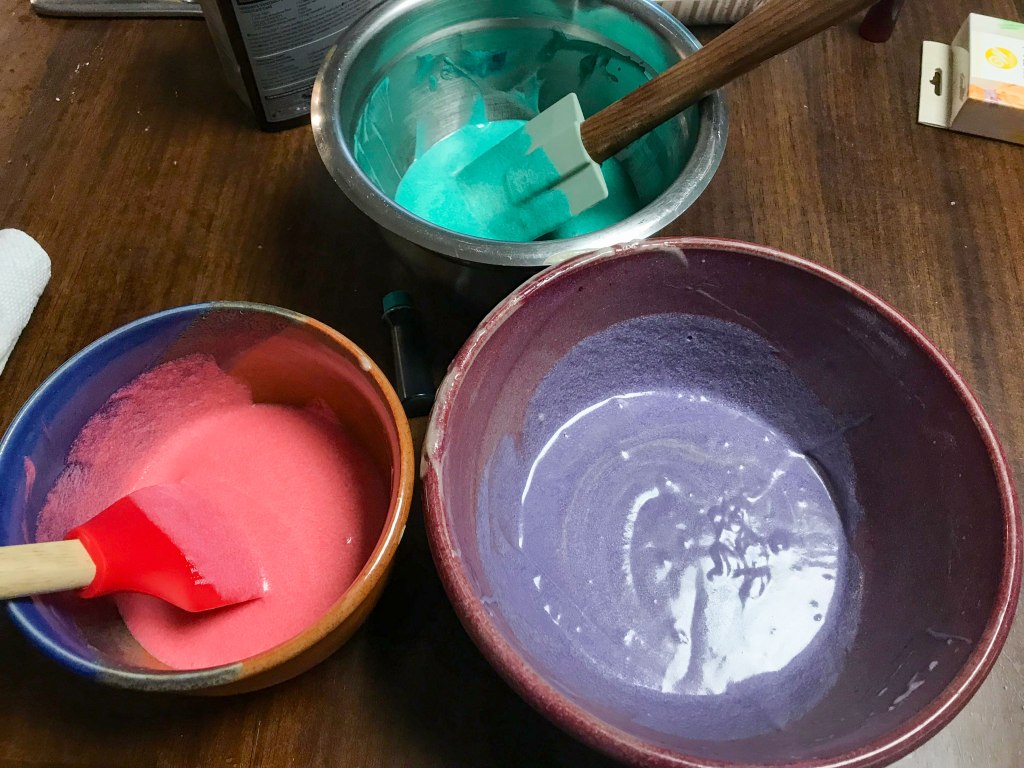
2. In two separate bowls make the cake mixes according to their instructions, substituting milk for the water and adding an extra egg to each. In the chocolate bowl, you can add some of the black food coloring to make it closer to a black color (like Knowsmore’s jacket).
3. Divide the white or vanilla cake batter evenly into three small bowls. Add a generous squirt of gel coloring (I used the purple, teal and magenta from this pack). Mix each thoroughly.
4. Cut parchment paper to fit the bottom of the 2 round pans and 2 rectangular pans. Spray each pan with cooking spray and place the parchment paper at the bottom.
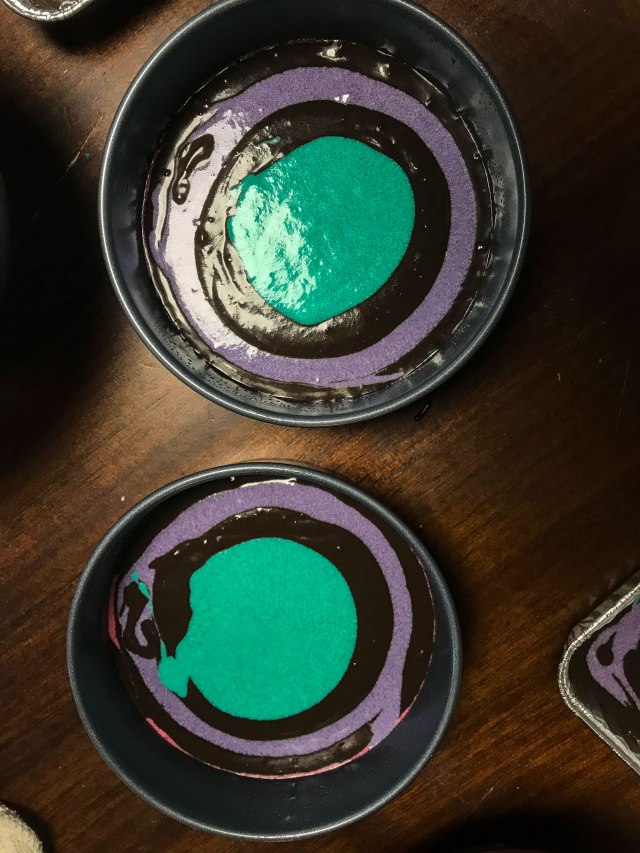
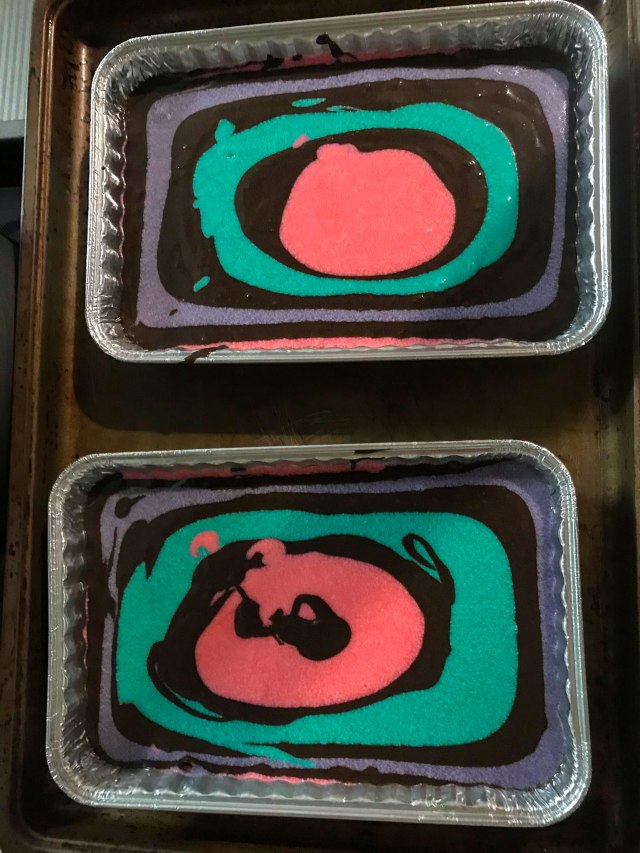
5. Use a 1/4 cup measure to add a scoop of chocolate cake batter to each pan. Then add 1/4 a cup of magenta to the middle of each. Add chocolate followed by teal and then chocolate again followed by purple. Repeat this process until you run out of cake batter making sure to spread it evenly to each pan and alternate chocolate between each colored layer. If you feel like you have already added too much batter to the pan, you can use the extra for a cupcake.
6. Bake at 350 for about 40 minutes or until a toothpick comes out clean. Check every 5-10 minutes after 30 minutes.
7. Allow the cakes to cool completely. After about 10 minutes, you can tip them out of the pan and peel off the parchment paper. In the meantime, you can make your frosting and refrigerate it a little. You’re going to have to make this frosting recipe twice.
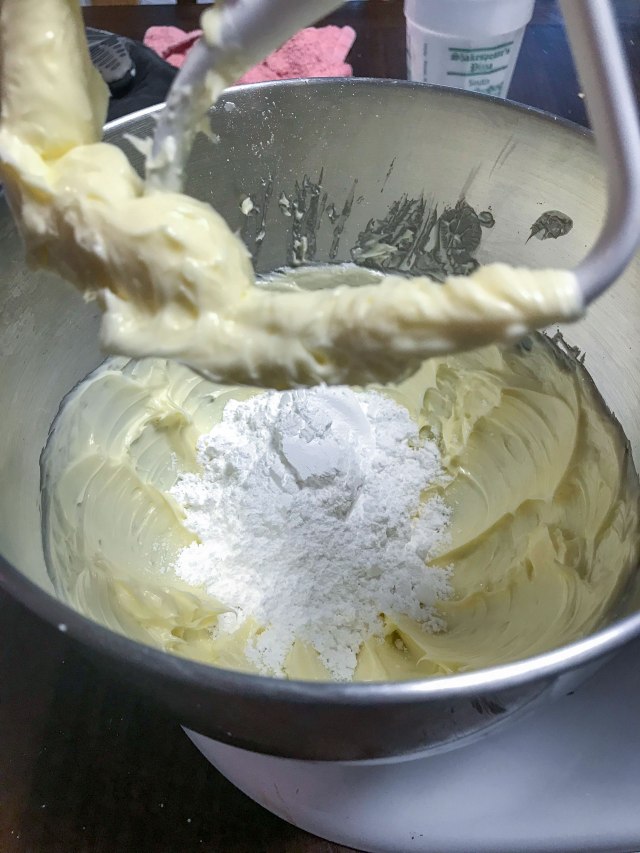
8. For “black” frosting: Cream the butter in the bowl of your stand mixer. Add the confectioners sugar. Mix on low speed at first, then increase the speed until combined. Add in your heavy cream and vanilla extract, and mix on medium to high speed for 8 minutes until light and creamy (the recipe I used says to be sure to do the full 8 minutes). Add the cocoa powder. Let combine fully. You want the frosting to be as dark as possible. Add a generous helping of the black gel. (This is the part where I ran into trouble. I couldn’t get the frosting dark enough so it’s more of a grey.) Mix to combine. Place frosting in a bowl in the fridge and clean your mixer.
9. For “purple” frosting:Cream the butter in the bowl of your stand mixer. Add the confectioners sugar. Mix on low speed at first, then increase the speed until combined. Add in your heavy cream and vanilla extract, and mix on medium to high speed for 8 minutes until light and creamy (the recipe I used says to be sure to do the full 8 minutes). Set aside a small portion of the white to become the yellow for the tassle. Add the purple gel coloring. Mix to combine.
10. When cake is cool, you can start to arrange it. At this point, if you’re not going for the Knowsmore look, you can break away into your own personal design. But I’m going to keep walking through my steps. I started by drawing out my cake design. (Something I’ve taken to doing lately! I’ve probably been watching too many cake design shows on the Food Network.) I based my design on this screenshot of Knowsmore from Ralph Breaks the Internet.
11. Place one of your 6 in rounds in the bottom half of a cake spinner or on whichever display dish you are using.
12. Cut two identical cross sections out of the rectangle. This will be his cap. Judge for yourself how big you want it to be. From the remaining cake cut two small squares to be the connecting part. Cut side at a diagonal to form a right triangle. Move this triangle of cake to the other side of the rectangle to make a parallelogram.
13. Place the small square and parallelogram on the cake spinner to form the basic shape. Frost the top and add the second layer. Frost the whole thing with the vanilla frosting for your crumb coat.
14. Chill the cake until the frosting is a little hard and crunchy.
15. Frost the circular part of the cake with the purple and the cap part with the black chocolate buttercream.
16. Add some black chocolate buttercream to a piping bag and use a round tip to pipe Knowsmore’s glasses, eyes, mouth and eyebrows.
17. Mix some yellow and a tiny drop of orange gel food coloring into the little bit of white buttercream you set aside. Add to a small piping bag and pipe the gold tassel on the cap.
18. Chill for a bit to set the frosting. Slice, admire your handiwork and enjoy!
MY TAKEAWAYS:
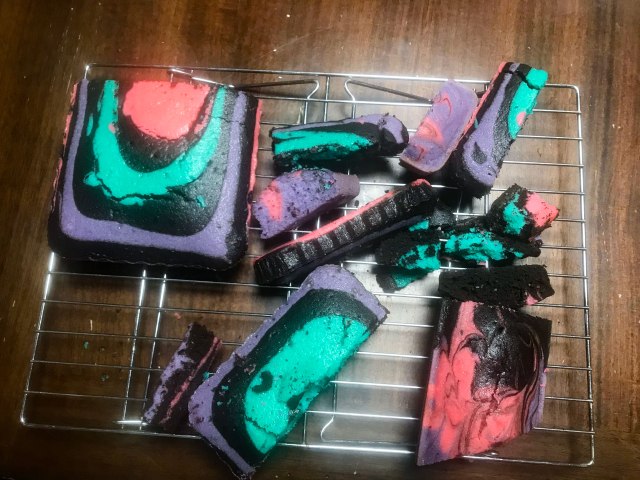
I am super happy with the way this cake turned out! I had no reference for the inside and no idea how it would look, but I love the inside and will definitely be employing this technique again. It’s very easy and looks really impressive. My goal with the coloring was that the black would be Knowsmore’s coat and the multicolors would represent the Internet. I think it worked out well! The cake itself was really yummy and the chocolate buttercream was subtle but delicious.
I wish the decorating had gone a little more smoothly. A lot of that comes down to time (my family was very impatient for cake and this one took a while) and the black frosting. I plan to continue my quest for a successful black buttercream. While it may not have looked super high end, my brother LOVED the cake so I count it as a major triumph.
If anyone has had any better success with black buttercream, let me know!
Here is the link I used for the black buttercream.